Menus with Beauty and Brains 4 pg 4: Production Graphics with Wendy Peck at webreference.com
 |
Menus with Beauty and Brains 4: Slicing Images with ImageReady | |
| ImageReady changed slightly between versions 5.5 and 6 in how it works with Photoshop. If you are using version 5.5, you will have to save when switching between the two programs. I will not state that in the instructions. You are presented with an alert if you have not saved before switching. | ||
|
The Jump to button in Photoshop leads directly to ImageReady with the current image open. |
ImageReady has some editing capability, but it is best to do the creation work in Photoshop and the slicing and saving in ImageReady. Following that policy keeps each program doing what it does best. Prepare your images as described on the second page of this article. Jump to ImageReady by clicking on the bottom button in the toolbox. (There is a corresponding button in ImageReady that leads back to Photoshop.) |
|
|
Slice is set using the Slice tool.
Editing the slice only affects where ImageReady will slice the image. In the top sample, the About Us menu item contains the dividing bar. In the lower sample the bar would not be included with this menu item.
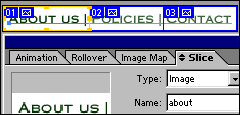
There are now three slices for this image, with only the far right slice selected. |
Slicing an Image
If you have the program set to snap to slices (View> Snap To> Slices) the next slice will snap to the first if you place your cursor close to the slice. Draw the second slice. Note that there is now a 01 and a 02 slice, and the slice outline for the first slice is shown with a blue outline. The yellow outline signifies a selected slice. This image is now ready to name and optimize, before we set up the rollover images. |
|
|
The optimize window with settings for the selected slice.
|
Optimize Slices Naming Slices Note: I am not covering the automatic HTML generation feature in ImageReady, but if you want to use this feature, you must fill in the Link and Target fields on this screen. We are now ready to create a rollover ... almost finished. Although the setup does take time, the beauty of this system is that you can change many things about your menu look, but as long as you do not change the size of the sliced areas, you can just save the whole set again with just a few clicks. |
|
Menus with Beauty and Brains 4: Tutorial IndexPhotoshop and ImageReady Rollovers |
Created by Wendy Peck,
URL: https://www.webreference.com/graphics/column47/
Created: May 14, 2001
Revised: May 14, 2001


 Select
the Slice tool as shown here. Click and drag over the area for the first
slice. A yellow border will appear, with handles along the edges. This
is your slice, and is not related to the image at all. You can resize
the slice using the Slice Select tool (in the fly-out for the Slice
tool), but the image will not be affected, other than the changes to
the size of the slice. Think of the slices in an ImageReady document
as a transparency placed over the image to mark where to cut the image.


 Find a programming school near you