Menus with Beauty and Brains 4 pg 2: Production Graphics with Wendy Peck at webreference.com
 |
Menus with Beauty and Brains 4: Creating Rollover Images in PS | |
|
|
Photoshop is a favorite program for many Web designers. Adding ImageReady, with its slicing and automated rollover capabilities, turned this giant of the print world into a viable option for Web work. Can you create rollovers in Photoshop, without ImageReady? Yes, and occasionally I do that if I am doing a single rollover image. Working in layers, and using the Save for Web feature does the job as well as ImageReady. However, if you are creating a menu, or any other type of image that requires separate areas, ImageReady is the best route. I will start with a short description of how to create the rollover effect. Then I will show you how to save the rollover images directly from Photoshop and then move to creating a menu using ImageReady. |
|
|
The top image here was created with separate layers for each image in the rollover. The rollover image for the lower sample was created by applying a yellow color overlay to the original layer. There is no difference in the final result. |
The secret to any rollover in Photoshop (or any other program) is to be perfect. You saw the example on the previous page that was only one pixel off from perfect. I usually create my rollover effects by creating new layers, and to keep the perfect alignment, I always duplicate the original layer before applying the desired rollover effect. Many designers create rollover effects by using layer styles, including color overlay to change the color. How you create the effects is not important precision is. The samples at the left used different methods to change the color on the rollover image, but the effect is the same. I will only show these two methods for changing the color for a rollover, although there are many different ways to create a rollover effect. 3D effects can be used to make the image appear to be on a button that is pressed down. A simple drop shadow on either the original or the rollover image can simulate movement, and let the user know a link exists. |
|
|
|
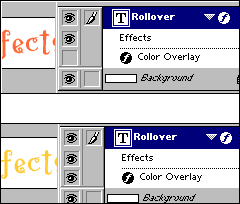
Color Overlay Rollovers The screen shot at the left shows the original orange image. The color overlay effect has been added, but note that it is set to be invisible. The lower sample shows the active effect, and the image is now yellow. That's all there is to that method. You will face no problem with precision using this method, since you are only changing the color of the layer, not aligning layers. Note: If you will be creating a menu and slicing it in ImageReady, it is easier to keep all of your menu items on one layer. |
|
|
|
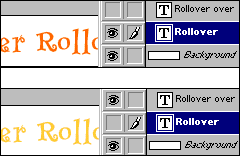
Separate Layer Rollovers Select Layer>Duplicate Layer, or right-click the layer and select Duplicate Layer from the menu. Assign a name to the new layer that will be easy to identify, as you will be switching between layers to save your rollover images later. On the new layer, change the color of the text, or add the effect you desire. The sample at the left shows both the original layer as active (orange text) and then the new layer (yellow text) active. Note that only one layer is active at a time. If you require more than one rollover state, create another layer as above with the desired effect. |
|
|
Although the overlay method is precise and fast, I usually work with separate layers to create my rollover effects. I like the extra control I have to create effects, although even I admit that most rollovers I do could be accomplished with layer effects. Choose the method that works best for you, or both at different times. Carry on to learn how to save the graphics you require for your project. |
||
Menus with Beauty and Brains 4: Tutorial IndexPhotoshop and ImageReady Rollovers |
Created by Wendy Peck,
URL: https://www.webreference.com/graphics/column47/
Created: May 14, 2001
Revised: May 14, 2001


 Find a programming school near you