Look Ma ... No Pixels 2 pg 5: Production Graphics with Wendy Peck at webreference.com
 |
Look Ma ... No Pixels 2: Vector Text and Adding/Deleting Nodes | |
 |
There is one more area of vectors that we need to visit ... text. Did you remember that Paint Shop Pro offers vector text? Well, it does, and if you find yourself creating stylized text, this next section should raise your heart rate a little. Vector text is a little different than other vectors as it starts life. The characters that form words are controlled by the specified fonts. However, you can convert the characters to vector objects, and apply all that we have talked about with vectors to converted text. In the sample at the left, the black text is as it was typed. I converted the text to vector objects, and then moved some nodes, and moved, rotated and colored the individual objects to form the stylized version below. |
|
|
Top: Text converted to curves using As Single Shape setting. Lower sample was converted with As Character Shapes. |
Converting Text to Curves Create your text and make it as close to the end result you desire as possible. Activate the Object Selector tool and select the text. Right click on the text and select Convert Text to Curves from the flyout menu. You now have two choices. Select As Single Shape if you wish to keep the characters in roughly the same place. However, more often you will probably want the freedom of As Character Shapes. This breaks the text apart and makes each character an individual vector object. See the sample at the left. The top sample has been converted to curves using the As Single Shape setting. The lower sample was converted with the As Character Shapes setting. |
|
 |
Once you have converted your text to curves, you can treat it as you would any other vector shape. Using the Object Selector tool, you can move, resize, rotate and color the individual characters. In the sample at the left, I have rotated the "E" and "T," moved the "X" up and given each a different stroke color. Have fun ... there is no difference between these letters and the rectangles and ellipses we have worked with from the beginning of this article. | |
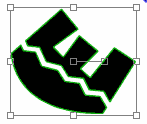 |
 Here,
I have converted the line forming the back of the "E" into a
curve and used the control handles to form a bow shape. The node edit
mode is shown at the right, with the control handle that created the curve
showing. Here,
I have converted the line forming the back of the "E" into a
curve and used the control handles to form a bow shape. The node edit
mode is shown at the right, with the control handle that created the curve
showing. |
|
|
Red highlights the node to be deleted and where the new line will be created.
Node deleted and the nodes at either end of the break selected, ready to be joined.
Line converted to curve and pulled into shape with the control handle. |
Adding, Deleting and Joining Nodes Often, we can just move nodes and convert lines to curves, or visa versa, and achieve what we need. But at times we need to go even further and add or remove nodes to create the right effect. Deleting a node will often improve the shape of a curve. Adding and subtracting nodes, often involves breaking apart and rejoining lines. In the sample at the left, I have a close-up view of the "X" in Node Edit mode. The red circle identifies a node that I am going to delete in order to create a straight line, shown by the red line. I will then convert the line to a curve to produce a smooth curve rather than the zigzag pattern that is there now. In Node Edit mode, select the node you wish to delete. Press your Delete key, or right click on the node and select Edit>Delete. The line will be broken. Select the node at one end of the break, then using your Shift key, select the node at the other end of the break. Right click on one of the nodes and select Edit> Join Select. This will join the two end points into a line.
|
|
|
Cursor in position and Ctrl key pressed ready to add a node.
Three nodes added and center node pulled to form notch. |
Finally, there is just one more tool hiding in the bottom of the vector toolbox. There are times when the original shape just does not provide a node where you need one. It should not be surprising that you can look after that problem easily. We might as well continue to torture the "X." Don't you think the left side is just a bit too plain? A little notch in the side would be perfect. To add a direction change, you must add a node. Position your cursor
over the exact place you would like to add a node. |
|
|
Editing nodes, like any editing topic, is best mastered with a great deal of practice. I have started you off with the basics. The Paint Shop Pro manual and online help are rich resources for more information and tricks. But nothing will replace a few hours spent pulling on control handles and converting lines to curves and curves to lines. There is not a line or shape you cannot create now ... practice will sink the techniques deep into your mind so that you can quickly find the best route to the desired effect. You've worked hard to learn the techniques if you followed all of this article. Make sure you keep the skills fresh so that you have them when you need them. And have fun ... with vectors, you are really starting to take control of your graphics. |
||
|
|
Look Ma ... No Pixels 2: Tutorial IndexPaint Shop Pro Paths |
URL: https://www.webreference.com/graphics/column46/
Created: April 30, 2001
Revised: April 30, 2001


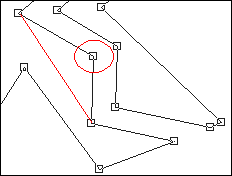


 To
convert the line to a curve, click off the selection to deselect the
nodes and select the lower node. Right click and select Node Type>
Curve After. A control handle will appear (highlighted by a red arrow
in sample at the left) and you can pull the line into the shape you
desire. The final result is shown at the right.
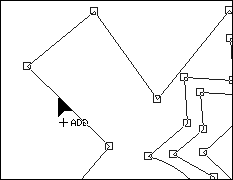

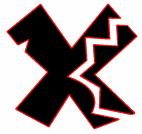 Press
your Ctrl key down and the word "ADD" will appear beside the
cursor. Click and a node will be added. In order to make a notch however,
you will need to add two more nodes. Repeat the previous instructions
to create two more nodes in the same area. Pull the center node in to
the center to create a notch as shown at the left. The final result
is shown at the right.
  Find a programming school near you