Look Ma ... No Pixels 2 pg 2: Production Graphics with Wendy Peck at webreference.com
 |
Look Ma ... No Pixels 2: Creating Vector Shapes in Paint Shop Pro | |
|
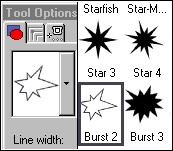
Shape selection menu in the Tool Options window.
Vector layer created automatically when shape is drawn. |
It's time to start drawing. Let's start by going through creating a vector object and editing the objects to start, and then we can move to editing the paths that create the objects. Drawing a Vector Shape Note: The shape selection for PSP 7 is shown. For earlier versions of the program, the method is similar, but you choose the available shapes by name, and have a much smaller selection of shapes. Click and drag on your canvas to create the shape. Don't worry about exact position, size or color at this point we will look at editing vector objects soon. Note how there are selection handles around the shape. Check the Layer Palette, and you will see that a vector layer has been added. You can rename the layer by double-clicking on the layer to open the the Layer Properties window. Enter the name you desire. That's all there is to creating a basic shape. To enforce the idea of vector capability, with the vector layer still selected, create one more shape (your choice). |
|
|
Drawing tool, one of the most powerful tools in PSP.
|
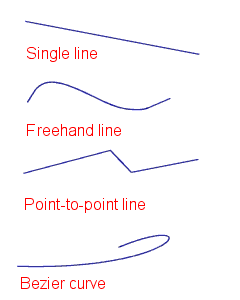
Drawing Vector Lines Note: The line drawing in PSP would fill an entire article. I will touch only on the basics here, but urge you to read through the online help sections on vector drawing, or the manual for a complete overview of the drawing capabilities. There are four basic functions offered with the drawing tool: Single Line; Bezier Curve; Freehand Line and Point to Point Curve. I am going to leave the Bezier Curve for last, so you can get used to working with the tool before we tackle the powerful, but confusing bezier drawing method.
|
|
|
Drawing a straight line with the Single Line Option. |
Single Line: When you need a straight line, this is the correct option. Select Single Line from the drop-down options. Click and drag to create a line. If you require a line to remain straight (90°) or be constrained to 45°, hold your Shift key as you drag. Release the mouse button when you reach the desired location for the end of your line. You can edit the color, size and width of your line later (see Editing Vector Shapes later in this article). |
|
|
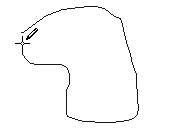
Creating a closed shape with the Freehand Line tool. The Close Path option will join your start and end points automatically. |
Freehand Line: This line works the same way as the single line, but the line will follow the path of your mouse. You can use this setting to draw curved lines, or closed freehand shapes. If you are creating a shape that you wish to fill, check the Close Path option in the Tool Options window. You can create a closed path without this option checked, but you must end the line exactly at your starting point. With the Close Path option active, your end point will automatically join your starting point. Don't worry if your line is not exactly right on with your first attempt (it is hard to draw a perfect shape with the mouse). As long as the shape is roughly what you are looking for, you can create the perfect shape by editing nodes (later in this article). | |
|
Point-to-Point line with straight segments, and a curved segment in progress.
|
Point-to-Point Line: This option provides an easy way to create complex shapes, especially if straight and curved line segments are combined. To start a line, click and release the mouse button. For a straight line segment, move the mouse the the desired end of that segment and click. A straight line will appear between the two points. Click again in a different location to create another straight segment. Double-click to end a line. If you want to add a curve, click and drag in the direction you wish to go, instead of click and release. This is your first introduction into drawing bezier curves. Working with bezier curves can be confusing, especially when working with multiple lines. What I recommend, instead of trying to plow through written instructions, is to experiment. Click and drag observe what curve results from dragging in different directions over different distances. Try to create the rough spiral I have shown at the left. The click points and drag direction are shown in red for the outside round. Drag only a short distance in the direction of the arrow and move to the next click point. If you are getting a line that curves backwards past the outer limit of the spiral, you are dragging too far. Continue the pattern to complete the spiral.
|
|
|
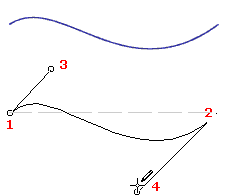
Creating a bezier curve. The sequence of clicks is shown by number.
|
Bezier Curve: You met this curve in the Point-to-Point option for the Draw tool. My recommendation to learn in the "click-and-drag experimental" way stands, although I will go into this a little more for a simple bezier line to help you understand what is going on with this drawing tool. We will create an "S" curve. Drawing this curve in a freehand line would be very difficult. My mouse skills are pretty good, but there is no way I can create a graceful "S" without calling bezier curves to my side. Creating a bezier line takes four clicks. The first two clicks define the start and end point of the line. The third click defines the starting curve shape and the final click defines the end curve shape. See the sample at the left. I clicked at point 1 and dragged, using my Shift key to point 2 to create a straight line. The curve for the start of the line was set by clicking at 3 (you can click and drag if the shape is not perfect). Finally, I clicked and dragged at 4 to create the curve for the end point. Bezier curves create elastic lines, that will always be smoother than the same line drawn with a freehand tool. Start from the sample above, and experiment with lines until you are comfortable with how the lines and curve points are relating. Try to recreate the set of curves that I have provided at the left, keeping in mind that the first two clicks define where the line will be, with the third and forth clicks defining the start and end angles respectively. Now that we have looked at the vector drawing tools in Paint Shop Pro, let's learn how to edit our shapes. |
|
Look Ma ... No Pixels 2: Tutorial IndexPaint Shop Pro Paths
|

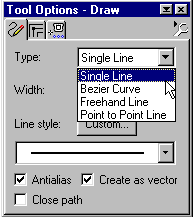 For
all of the following line types, select the Draw tool. Choose the line
type from the Type drop-down selector in the Tool Options window as
shown at the right. Use the Width option to set line width. We will
not dive into the Line Style option here, but you should experiment
with the various line styles to understand the options you have. In
all cases for this example, leave the Antialias and Create as Vector
options selected. I will talk about the Close Path option later.
For
all of the following line types, select the Draw tool. Choose the line
type from the Type drop-down selector in the Tool Options window as
shown at the right. Use the Width option to set line width. We will
not dive into the Line Style option here, but you should experiment
with the various line styles to understand the options you have. In
all cases for this example, leave the Antialias and Create as Vector
options selected. I will talk about the Close Path option later. 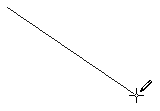


URL: https://www.webreference.com/graphics/column46/
Created: April 30, 2001
Revised: April 30, 2001
 Find a programming school near you