Look Ma ... No Pixels 2 pg 3: Production Graphics with Wendy Peck at webreference.com
 |
Look Ma ... No Pixels 2: Editing Vector Shapes | |
|
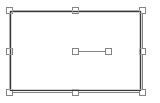
Object selected with the Object Selector. Resize with the handles on the perimeter.
Rotating a vector object.
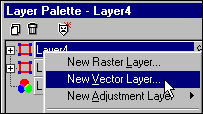
Creating a new vector layer. |
You have just been through a tour of all the vector drawing tools in Paint Shop Pro. There are some pretty impressive capabilities in the drawing, but the power of vectors only becomes truly evident when you start to edit the shapes you have drawn. We will start with the basics to make sure that you have perfect control of the major items like resizing, fill and stroke, and then move to editing nodes. Editing a Vector Shape To work with a vector shape of any type, you must select the Object Selector, as shown at the left. When the object is selected, you will see handles around the perimeter, and a rotation handle in the center of the object. To resize, click and drag on any outside handle. The corner handles allow you to resize in any direction, while the top and side handles allow resizing for that direction only.
To rotate the object, click on the handle point beside the center point and drag to rotate the object. Release the mouse when the object reaches the desired position. You can constrain the rotation to 15° increments by holding the Shift key down as you rotate. Keep in mind that you can edit vector objects across layers. It does not matter what layer is active, when you are working with the Object Selector, you can select any vector object without selecting that layer. This is very handy for working with objects across layers, but for those who are used to working with raster layers, a little caution is necessary. Note: Although you can add, and edit, many objects to one vector layer, it is often a good idea to place vector objects on individual layers. Before you add any effects, you must change the layer to raster format, which, of course, combines any vector objects into pixel format and removes individual object editing properties. If you will be converting vector layers to raster, make sure that you plan accordingly and create objects on separate layers. To create a vector layer, right click on any layer in the Layers Palette and select New Vector Layer from the menu. |
|
|
|
Editing Color and Stroke Note: Occasionally, the effect does not show if the edited object layer is not selected when you make your edits. If this happens, simply make your changes and accept. Activate the layer containing the object you edited, and the changes will show on the canvas. Once you have selected the object layer, you can return to the Vector Properties window to make changes and the edits will show live on the canvas. (Just one of those little quirks that all programs have occasionally.) |
|
|
|
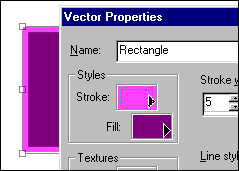
You can edit the stroke color and thickness of a vector line in the same way. Double-click on any vector line. In the sample at the left, I clicked on the stroke arrow to bring out the flyout menu, choosing the gradient option. Clicking on the Stroke sample chip brought me to the stroke gradient menu, where I chose a preset gradient. Note: The gradient and pattern stroke options were added with PSP 7. If you are working with earlier versions, you can follow the instructions here, but you will be limited to solid color choices.
|
|
|
Custom end caps on a line.
Custom dash screen. The red and blue lines in the drawing screen correspond to the results in the viewing screen.
|
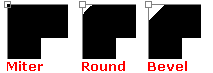
Editing Line Style With PSP 7, you also have nearly unlimited options to create line style variations. Line styles, like dots and dashes, as well as line ends are very easy and are controlled through the Vector Properties window.
You can also customize a dashed effect for your line. Click the Custom button for Line Style in the Vector Properties window. The image at the left shows the custom dash drawing screen. The raised portion represents the dash (red arrow), and the area between the raised portion and the icon at the top represents the space (blue arrow). I have used the red and blue arrows to show the relation between the drawing area settings and the preview screen below. Click and drag on the icons in the drawing screen to adjust dash and spacing width. You can add more dashes by clicking on the Add button and setting the size and spacing as for the first dash. Try out a few options. This can be a handy feature when you are looking for a very specific look for your lines or vector shapes. |
|
|
|
Finally, you can add caps to the start and end of each dash in the line style. Prepare the dashed line as above, and select Different Segment Caps in the Styled Lines window. Set the dash segment caps in the same way as you set the line ends. You will probably have to increase the size of the segment caps by clicking on the Size button beside the Segment Start and Segment End selections. The Styled Lines window is shown at the left, with the result below.
Now you have all the basic elements for working with vector shapes, but we have not even touched on the most exciting function yet. Carry on to learn how to edit vector nodes. |
|
|
|
Look Ma ... No Pixels 2: Tutorial IndexPaint Shop Pro Paths
|


 To
choose a preset line style, simply choose the desired effect from the
Line Style option. To create a custom line, like the one shown at the
left, click on the Custom button to open the Styled Lines window. Add
line start and end symbols by choosing from the drop-down selector in
the Styled Lines window as shown at the right. (The line at the left
has the Tulip cap chosen for the First Cap, but to save space, the sample
from the Styled Lines window shows the Round end cap as the selection.)
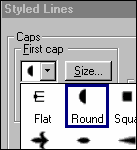
To
choose a preset line style, simply choose the desired effect from the
Line Style option. To create a custom line, like the one shown at the
left, click on the Custom button to open the Styled Lines window. Add
line start and end symbols by choosing from the drop-down selector in
the Styled Lines window as shown at the right. (The line at the left
has the Tulip cap chosen for the First Cap, but to save space, the sample
from the Styled Lines window shows the Round end cap as the selection.)
URL: https://www.webreference.com/graphics/column46/
Created: April 30, 2001
Revised: April 30, 2001
 Find a programming school near you