Fireworks Effects pg 5: Production Graphics with Wendy Peck at webreference.com
 |
Fireworks Effects: Enhance Your Designs with Styles | |
|
|
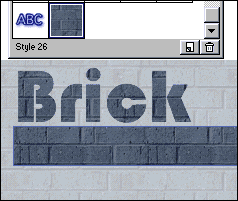
You can save the settings that you have used on a special style. Take a look at the image shown here. I created the text first and then created a style for one-click application of that style to any object. You choose what you wish top have included with the style, and that can include text information so that text is consistent on every application. Fireworks styles can save you so much time, and improve quality, since every object with a style applied will be consistent. |
|
|
The Styles window.
Object selected and a Style is created from the Object. Note the thumbnail image in the Styles window.
A style created with text attributes will be shown as text in the Styles window thumbnail. |
We'll start our look at styles by learning to apply a preset style. Then we will unleash your creative spark by learning how to create custom styles. Styles are controlled through the Styles window. Select Window > Styles to open. To apply a preset style, select the object you wish to apply the style to and click on the style. That is the whole task. The attributes from the style will be passed to the object. Of course, you will want to create your own styles. You can edit a style or start one from scratch. To edit an existing style, first apply that style to an object as described above. Change the parameters that you would like to change, like fill or stroke, or text information. When you have the object complete, click on the arrow at the top right of the Styles window to open a drop-down menu. Select New Style. Assign a name for your style and choose which values you would like to have included in the style. Click OK and the style will appear in the Style window. The method is almost the same when you wish to create a style from scratch. I liked the dark gray brick that I created a while back, and created a style for that fill. Simply create the look that you desire, select an object containing the values you wish to save, and select New Style from the Style window drop-down menu. Name your style and choose the parameters that will be included in the style (you may wish to include the fill from an object, but not the outline). In the sample at the left, note how there is now a thumbnail representing the gray brick fill. When you create a Style containing fill details, but no text information , you can still apply that fill to text. However, if you wish the font information to be part of the style, you must edit or start with a text object. Set the text attributes and create a style by choosing New Style from the drop-down menu. The icon in the style window will show up as "ABC" in the Styles window when you create a style that includes text attributes. You can use a text style to apply fill to non-text styles. You can also add text attributes to non-text styles that have been applied to text. However, it is best to know what you are doing with styles and to create them with the end use in mind. So ... take the fills and effects that we used in the first few pages, and start creating styles to share through your documents. It is a wonderful way to save time and create true consistency in your work. Don't forget that we often return to a project a month, or even many months after completion. Styles will save you a great deal of time trying to remember exactly what attributes have been used to create your objects. |
|
|
|
Fireworks Effects Tutorial IndexFireworks Effects: Choosing is the Hard Part
|


URL: https://www.webreference.com/graphics/column40/
Created: December 24, 2000
Revised: December 24, 2000
 Find a programming school near you