Paint Shop Pro Layers pg 3: Production Graphics with Wendy Peck at webreference.com
 |
Paint Shop Pro Layers: Working with Layers | |
|
Make layers invisible by clicking the eyeglass icon. The contents of the layer are not affected, and another click to the icon will make the layer contents visible again. |
Merge layers To merge the entire image, simply right click on any layer and choose Merge>All>Flatten. You will be left with exactly the same result visually, but all your layers will have merged into one. You can also merge only the images that are visible in the document. To make a layer invisible, click on the eyeglasses near the center of the Layer Palette. An "X" will appear through the icon and the contents of that layer will disappear from the document screen. (Click again to make it visible again.) To merge several layers, but not all, simply turn off the visibility for any any layers you do not wish to merge. Right click on any layer and choose Merge>Visible. Be careful though. A merge cannot be reversed unless you can use the Undo command. |
|
|
|
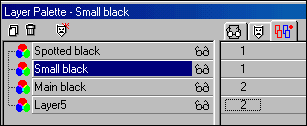
Group layers Click on the Group button at the right of the Layers palette as shown at the left, highlighted in red. When the Group tab is active, the right side display changes and each layer will have a "None" in the right column. Groups are arranged by assigning numbers, and numbers are specified with repeated clicks on the layer group listing. A left click increases the number and a right click reduces the number. Think of setting a digital alarm clock with this operation. In the example below, I have clicked once in the group area for the layers titled, "Spotted Black" and "Small Black." These two layers now belong to the group "1" and if one is moved, the other will also be moved. I clicked twice in the group area for the "Main Black" layer and "Layer5." These layers are now grouped in group "2," and will move together.
If I wanted to add the layer "Main Black" to group number "2," I would RIGHT click one time on the "Main Black" Group area. Right click reduces the number, so that layer is now in group "1." |
|
|
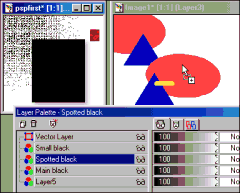
The active layer is ready to be dropped into another document. The cursor changes to a + when it is over an area that can receive the layer. |
Share layers between documents Simply click and drag a layer from the active document to the destination document. The layer is pasted into the destination document as a new layer. The layer also remains in the original document. This is a very handy feature when you are creating comps for clients. Drag constant elements from one document to another, saving time and maintaining consistency. That's the basics for layers in Paint Shop Pro Read on to learn more about vector layers and then applying layer effects. |
|
|
|
Paint Shop Pro Layers Tutorial IndexPaint Shop Pro Layers Start |
URL: https://www.webreference.com/graphics/
Created: August 30, 2000
Revised: August 30, 2000


 Find a programming school near you