Paint Shop Pro Layers pg 2: Production Graphics with Wendy Peck at webreference.com
 |
Paint Shop Pro Layers: Layer Basics | |
|
A layer preview pops up when you hold your mouse over a layer in Paint Shop Pro The red circle marks the New Layer icon. NOTE: Don't miss Masks are Easy ... Really, if you are interested in making the most of your layers. With a solid understanding of layers and the power of layer masks, you can accomplish fantastic effects.
|
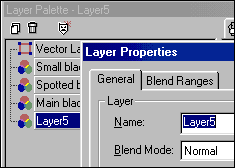
We should start with a few basics about layers in Paint Shop Pro. I have included the image from the previous page, along with a section of the Layers Palette. I created one layer for each of the three rectangles that form the base of this image. Although Paint Shop Pro does not have thumbnails visible at all times to help determine which layer contains which objects, it has a wonderful mouseover thumbnail that is truly large enough to identify even subtle differences between layers. Simply hold your mouse over the any layer in the Layer palette and the thumbnail you see in the image at the left will pop up. Raster and vector layers Take a look at the sample shown here. I have added a vector layer to the previous sample. Note how the first four layers have a set of circles to the left of the layer name. The vector layer, named (most creatively) Vector Layer, has a rectangle with selection points as an icon. It is important to be able to distinguish between raster and vector layers, since there are many features that cannot be applied to a vector layer. |
|
|
Layer5 is the result of choosing Promote to Layer from a popup menu. You can double click on the layer to rename it to a meaningful name. |
Background layers I still prefer to have a background layer, though. Most times when we are working with layered images, we want the layers to have transparent backgrounds. Without a background, we would be working with the checkered background that signifies transparency. When I open a file, like a photograph, I will usually promote the automatically created background layer to a regular layer. I then create a new layer, which I name Background. |
|
|
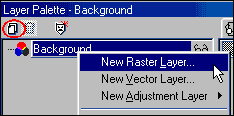
Right click on any layer and choose raster or vector as the new layer type, or click on the New Layer icon, highlighted with a red circle, to create a raster layer.
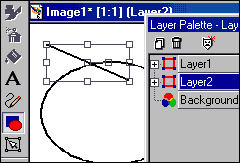
Creating a vector object will create a new vector layer. Note that Layer1 and Layer2 are vector layers. Each layer holds one of the vector objects shown on the canvas. |
Add a layer With a raster layer active, you can also add a vector layer by simply choosing the Preset Shapes or Draw tool, and creating a new object. A vector layer will be created to hold the new object. However, if a vector layer is active, the new vector object will be placed on the active layer. Duplicate a layer Reorder a layer Delete a layer Make sure you read on to discover the secrets for organizing your layers. |
|
Paint Shop Pro Layers Tutorial IndexPaint Shop Pro Layers Start |
URL: https://www.webreference.com/graphics/
Created: August 30, 2000
Revised: August 30, 2000


 For
those who are used to raster format programs, or worked with Paint Shop Pro before vectors were added, a raster is the familiar layer type.
Vector layers are used for vector objects and can be converted to raster
format at any time. Raster layers cannot be converted to vector format.


 Find a programming school near you