Vector Gradient Fills pg 5: Production Graphics with Wendy Peck at webreference.com
 |
Vector Gradient Fills: Freehand Blends | |||||
|
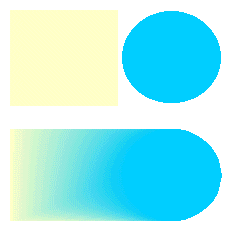
The two objects in the top row are blended in the lower view. |
I warned earlier in this tutorial that we would only be taking a very short look at blends in this article. It warrants an entire tutorial, but I did want to include the idea here, since often the perfect effect may not be possible with a gradient fill, but can be accomplished with a blend. Quite simply, a blend creates a gradient fill look, but with many controls available to you. A gradient runs from one color to another. A blend combines two objects together in incremental steps. In the sample at the left, the lower sample is a blend of the two objects above. |
|||||
|
For one click blending, open the Xtra Operations toolbar. |
Options to create a blend |
|||||
|
The samples here show the objects before and after blending.
Number of blend steps reduced to 5. |
Draw two objects. Fill with desired color and, in most cases, remove the stroke, especially if you are looking to create a custom gradient fill look. Select both objects with the Pointer tool. Click on the Blend tool from Xtra Operations toolbar or choose one of the menu commands described above. The two objects will blend.
|
|||||
 |
Finally, for this brief look at blends, you may wish to edit either the start or end object. With the Pointer tool selected, and the ALT or OPTION key pressed down, click on the object you wish to change. Only that object will be selected and you can change the color, size, position, etc. The blend will redraw with your new settings. In the sample shown here, I changed the color of the circle and the blend was changed to reflect the new information. | |||||
| This has only been a brief glimpse at the power of blends in Freehand. You can control the blends in many more ways, choosing where each object will blend in relation to the next object, blending along a path, editing the blend path ... if you can imagine a blend, there is a way to do it. However, that is for another time. In the meantime, experiment with this powerful tool, get comfortable with it, and you will find yourself returning to use blends over and over. | ||||||
|
|
Vector Gradient Fills Tutorial IndexVector Gradient Fills Start
|


URL: https://www.webreference.com/graphics/
Created: June 25, 2000
Revised: June 25, 2000
 Find a programming school near you