Vector Gradient Fills pg 4: Production Graphics with Wendy Peck at webreference.com
|
|
Vector Gradient Fills: Freehand Gradient Fills | |||
|
|
Gradient fills in Freehand work very much like a solid fill. You create an object and fill with the gradient. Colors, color distribution and angle of the fill are edited through the Fill inspector. Text objects must be converted to paths before a gradient fill can be applied. Select the text object with the Selection tool and choose Text>Convert to Paths. We will look at text later, but in case you decide to experiment before I get there, I wanted to warn you that text has some special rules. |
|||
|
|
|
|||
|
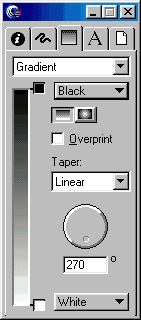
All gradient fill controls are set through the Fill inspector.
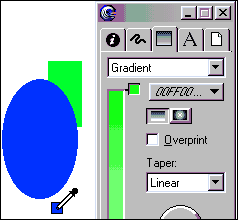
With the Eyedropper tool selected, click and drag a color chip from any object in the document to the color ramp to add colors to the gradient fill. Below: A color chip is dropped on the color ramp to add the color to the gradient.
|
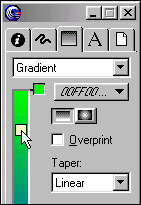
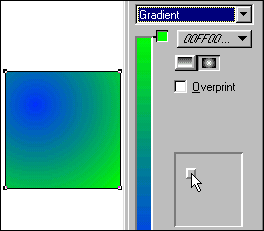
Start by creating a rectangle or ellipse for practice. There is no restriction on the complexity of the object you can fill with a gradient, but it is usually easier to understand how the color is working when you are working with a simple shape. Make sure your object is selected. Choose Gradient from the drop down selector in the Fill inspector. The gradient options screen will appear, and the object will fill with the default back to white gradient, or the previous custom gradient. You can choose Linear or Radial style by clicking on the appropriate button. The linear and logarithmic options distribute the color in different ways. A linear gradient blends from one color to another in equal sections. Logarithmic gradients start blending in small steps, with the size of the steps increasing as the blend nears the second color. Click and drag the Angle dial to set the angle of the gradient. 360 degrees sets the gradient direction left to right. Freehand has several color creation or picking options, and any may be used to access the colors required for a gradient fill. The easiest way to work with color on a Freehand gradient fill is to drag the color to the color ramp, which is the long color bar on the left side of the gradient window. Initially, the default gradient has a black color well at the top and a white color well at the bottom of the ramp. Drag a new color on top of the small wells, or choose a color from the drop down color list. For a really handy color option, you can also choose the Eyedropper tool, and click and drag on any color within your document to the desired color well. It doesn't get much easier than this for matching gradient fills to other objects in your document. To create a multicolor gradient, simply click and drag the new color to the color bar and drop it in the desired location. A new color well is added beside the color ramp, and can be dragged up or down to precisely position the color. Add as many new colors as you require for your custom gradient fill. To remove a color from the color ramp, simply drag it from the Fill inspector window. Radial fills are completed in the same way. You have the option to set the center point for the radial fill by dragging the icon in the Locate Center area of the Gradient window.
|
|||
|
|
|
|||
|
The top sample is text. The lower sample is text that has been converted to paths.
The top sample is text that has been filled with a gradient fill. The bounding box receives the fill. In the middle sample, the text has been converted to paths so the letters receive the fill, but each character is treated as a separate object with its own fill. In the lower sample, the objects have been joined to allow a continuous gradient fill. |
Gradient Fills for Text To convert, select your text object and select Text>Convert to Paths from the main menu. That's it! In the samples at the left, note how the selection borders change from the regular text selection (blue) with a bounding box and the text which has been converted to paths with selection handles only. When you apply a gradient fill to a text object that has not been converted to paths, the bounding box is filled with the gradient as shown here. The second sample shows the results of a horizontal gradient fill when the text has been converted to paths. However, we often require that the gradient fill treats our text as one object. In order to have the gradient move across the individual objects they must be joined. Choose Modify>Join to create this effect, as shown in the bottom sample at left. For even more control of a gradient fill look, continue on to the next page to learn the basics of blends in Freehand.
|
|||
|
|
Vector Gradient Fills Tutorial IndexVector Gradient Fills Start |
URL: https://www.webreference.com/graphics/
Created: June 25, 2000
Revised: June 25, 2000




 Find a programming school near you