Vector Gradient Fills pg 3: Production Graphics with Wendy Peck at webreference.com
 |
Vector Gradient Fills: Illustrator Gradient Fill Text and Blends | |||
|
|
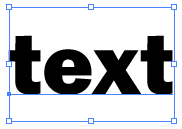
Text objects in Illustrator cannot be filled with gradient fills. However, by converting the text object to outlines, the text becomes the same as any other object. Converting the text is a simple operation, but make sure that you have all the editing you wish to do before you do the conversion. Text that has been changed to outlines cannot be edited as text. To convert, select your text object and select Text>Create Outlines from the main menu. That's it! In the samples at the left, note how the selection borders change from the regular text selection with a bounding box and the baseline of the text, to a bounding box with character nodes after conversion.
|
|||
|
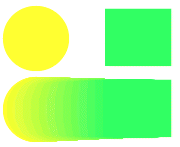
The top row here features two identical rectangles with different fills. The lower sample is the result of blending the two objects, selecting the top left hand node of the yellow rectangle to blend with the top right corner of the green rectangle.
The same blend as above, but with the circle center and the rectangle upper right corner chosen as blend points.
|
Blends A blend creates a gradient fill look, but with many extra controls available to you. A gradient runs from one color to another. A blend combines two objects together in incremental steps. See the samples at the left. The yellow and green box are blended for a look that is very similar to a regular gradient fill. The power of the blend though, is not in blending two identical shapes as shown here, but in the capability to blend completely different shapes, and choose which nodes from the first object blend with selected nodes in the second object. The second set of samples at the left illustrates a circle blending to a rectangle. The center node of each was used as the blend points. This may sound a bit confusing, but trust me for a few minutes and read on. It is really quite elementary.
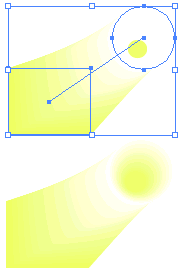
To perform a simple blend, create two objects. Fill each object with a different color and remove any stroke.
Click on the top left point of the rectangle and the top center point of the circle. Illustrator will pause for just a moment while it figured out the blend and will then redraw. In the result, as shown at the left, I have left the selection active to show the relation between the two objects. If you wish to edit either of the objects, you can use the direct selection tool to edit one of the objects in the group. Directly below the yellow and blue sample, I have selected only the circle and changed the fill to white to achieve this effect. You can also add another object and repeat. Only two objects can be blended at one time, but there is no limit to the number of items you can blend two at a time. The final sample here takes the yellow and white blend and adds another blend from the white circle to a new, small yellow circle. The illustration with the selection active shows the first blend, with the new circle drawn. The lower illustration is the effect after a blend has been created between the white circle and the new yellow circle. That's all we have room for this time, but I urge you to consider blends when you are looking for a gradient effect. It will take some practice before you can predict results with accuracy. But the total flexibility is well worth the time. |
|||
|
|
Vector Gradient Fills Tutorial IndexVector Gradient Fills Start
|

 To
fill with a gradient, you can follow the same method as for any gradient,
but it is usually best to use the Gradient tool to create a continuous
fill across all the characters. The sample here shows the effect. The
top sample has been filled simply with the Gradient fill command in
the toolbox. Note how each character has its own gradient fill. The
lower sample has been created by dragging the Gradient tool at an angle
across the entire word, creating one fill for all characters. All of
the instructions for editing and applying gradients we looked at on
the previous page apply once text has been converted to outlines.
To
fill with a gradient, you can follow the same method as for any gradient,
but it is usually best to use the Gradient tool to create a continuous
fill across all the characters. The sample here shows the effect. The
top sample has been filled simply with the Gradient fill command in
the toolbox. Note how each character has its own gradient fill. The
lower sample has been created by dragging the Gradient tool at an angle
across the entire word, creating one fill for all characters. All of
the instructions for editing and applying gradients we looked at on
the previous page apply once text has been converted to outlines. 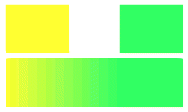


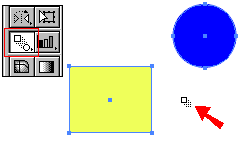 Select
both objects with the Selection tool. Activate the Blend tool as shown
here. Although you do not need to select the objects in order to create
a blend, it can help to see the bounding boxes in the beginning. The
selection will look as shown here. The cursor will change to the Blend
tool symbol highlighted here with a red arrow.
Select
both objects with the Selection tool. Activate the Blend tool as shown
here. Although you do not need to select the objects in order to create
a blend, it can help to see the bounding boxes in the beginning. The
selection will look as shown here. The cursor will change to the Blend
tool symbol highlighted here with a red arrow.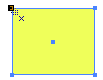 Move
your mouse over the first object, and a plus sign will be added to the
cursor. This indicates that you are on a path, and can choose a blend
point.
Move
your mouse over the first object, and a plus sign will be added to the
cursor. This indicates that you are on a path, and can choose a blend
point.
URL: https://www.webreference.com/graphics/
Created: June 25, 2000
Revised: June 25, 2000
 Find a programming school near you