Vector Gradient Fills pg 2: Production Graphics with Wendy Peck at webreference.com
 |
Vector Gradient Fills: Gradient Fills in Illustrator | |||||
|
|
Gradient fills in Illustrator, in their most basic form, work very much like a solid fill. You must create an object, and then fill with the gradient. Colors, color distribution and angle of the fill are edited through the Gradient palette. However, there is also a Gradient tool that will give you even more control. Text objects must be converted to outlines before a gradient fill can be applied. Select the text object with the Selection tool and choose Type>Create Outlines. We will look at text separately lately, but in case you run off to experiment before I get there, I wanted to warn you that text has some special rules. |
|||||
|
Object with solid fill and Gradient icon about to be clicked.
Clicking on the Gradient icon fills the object with the current Gradient fill.
|
Start by creating a rectangle or ellipse for practice. There is no restriction on the complexity of the object you can fill with a gradient, but it is usually easier to understand how the color is working when you are working with a simple shape. Make sure your object is selected. Click on the Gradient icon, located just below the background
and foreground colors in the Toolbox. That's it, as long as you are content with a white to black gradation with no angle adjustment. Of course, that is never what you want, so we must move to the Gradient palette to edit the graduated fill.
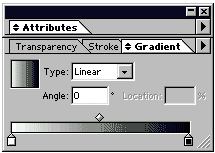
Choose Radial or Linear as the gradient type if desired. If you wish to set the angle for the gradient fill numerically, enter the desired value as the Angle option. (You can also set the angle by eye with the Gradient tool see below.) This is also where we can edit color, add color and adjust where the color changes take place. The color is controlled by the small color stops at the lower edge of the slider bar. In the default fill shown here, the color stop at the left is white and the left, black. To adjust color, make sure the Color palette is open (Window>Show
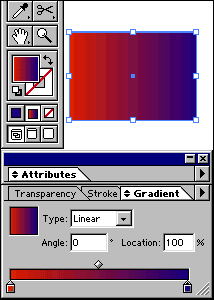
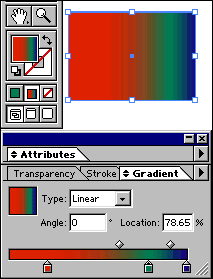
If you wish to change the black color, click on the right color stop and choose a new color as above. I have included a shot of the gradient palette with the Toolbox and the object at the left. You can add many color stops if desired. Simply click at the desired additon point below the color slider and a new stop will appear. it will be filled with the color that is currently at the addition location. Change the color as desired following the instructions above, but with the new color stop selected. If you wish to move a color stop, simply click and drag to the desired location. You can also adjust where the color blend between colors occurs. The small diamonds above the color slider represent the location where the colors blend. Click and drag to move the diamond to the desired location. See the sample at the left which has an added color, which has been moved, as have the color blend centers.Note how I have moved the left color stop to the right. This is great when you are trying to match a solid color to a gradient fill, as the edge will be pure color with no adjusted color from the other color stops. You can add as many colors as your RAM will support, and move each color blend point for a truly custom gradient fill. Make sure you are also checking your graphic, which will immediately reflect any changes you make. The gradient preview is rough sample of the color distribution, but gradients are not easy to predict, especially when you are filling irregular objects. |
|||||
|
|
||||||
|
Note: I have deliberately caused banding in this sample to let you clearly see the progression of color.
|
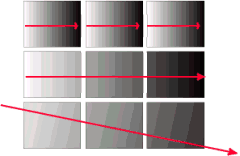
Gradient Tool When you fill an object from the fill color command, you do not have any control over what area of an object will be filled. The entire gradient goes from one edge of the object to the other, following the angle you have numerically set. With the Gradient tool, you can specify which area of the object will be filled with the gradient, and can also start the gradient from outside the object, and can set the angle by eye, which is usually more efficient. Drag the tool over several objects to create one continuous fill, which is essential for most text effects. To use the Gradient tool, start just as above by selecting the Gradient fill selection in the toolbox. Edit the gradient as above. Click on the Gradient tool to activate. Click at the spot where you would like the gradient to begin and drag to where you would like the gradient to end. Experiment with starting and ending the gradient well inside the object borders as well as well outside the borders to become comfortable with the various effects. I find that I often use this feature. For example, when making glass buttons for the tutorial, Classy Glassy Buttons, I used a gradient fill for the main shadow areas, then for the subtle areas, started the same gradient well outside the selection area and stopped just inside the selection area. Carry on to the next page to learn how to fill a text object with a gradient fill and an introduction to blends. |
|||||
Vector Gradient Fills Tutorial IndexVector Gradient Fills Start |
URL: https://www.webreference.com/graphics/
Created: June 25, 2000
Revised: June 25, 2000


 The
object will fill with the current gradient fill as shown in the second
image at the left. (Please forgive my banding ... it is more important
to show the Toolbox clearly in a tutorial than it is to have a nice
smooth graduation between colors.)
  Make
sure your object is selected. Open the Gradient window by choosing Window>Show
Gradient from the main menu, or by double clicking on the Gradient tool
in the toolbox, as shown highlighted in red here.
 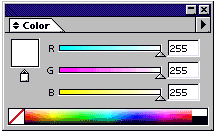 color)
and click on the color stop you wish to change. The current color stop
color will appear as the current selection in the Color palette swatch.
A color stop symbol also appears at the bottom of the single swatch
as shown here (the first color stop from the sample at the left is selected).
Move the eyedropper to the color selection bar and click to choose a
color or set color with the RGB values.
 Find a programming school near you