Classy Glassy Buttons pg 2: Production Graphics with Wendy Peck at webreference.com
 |
Classy Glassy Buttons: PhotoShop Rounded Rectangles | |
|
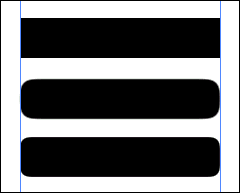
Rounded corner rectangles created in PhotoShop. Original shown first with Blur and Levels used to round the selection to different degrees. |
One of the mysteries of software can be what the program cannot do. You do not often hear a bad word from me on most software, especially PhotoShop since we have been buddies for nearly a decade. But it is still a mystery to me that there is no rounded rectangle selection capability. However, many have come up with creative ways around these gaps. I have seen many solutions, but this one is elegant, flexible and fast and is the one I have used for a while. I will step through the method, but have also created a set of actions you can download to instantly turn any rectangular selection into a rounded rectangle. That download is at the bottom of the method (you should understand what the action is doing before you take the easy route). |
|
|
Save selection as channel creates a new channel from the current selection.
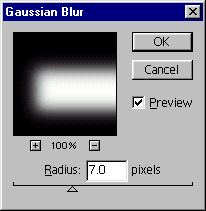
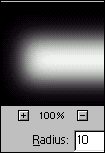
Gaussian Blur used to round the corners of the rectangle.
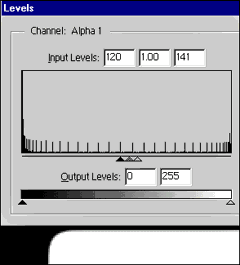
Adjusting the levels makes most of the pixels black or white as you can see just below the Levels window.
|
Rounded corner rectangular selection Choose the Channels tab to open the Channels window. Click on the Save Selection as Channel icon as highlighted in yellow, which will create the Alpha 1 channel. Click on the Alpha 1 channel to activate. Your document will look like the sample shown here below the Channel window and any editing we do will affect the channel rather than the actual document. Make sure there is nothing selected (Select>Deselect or CTRL D). We are going to apply a blur to round the edges. In a later step, we will take away all the gray shading, but for now we are just looking for general shape. Choose Filter>Blur>Gaussian Blur. Adjust the Radius amount until the general outer seems to be the shape you desire. Remember this is only a selection we are making, and no changes will be made to the document. If you get the wrong shape, just start over. The two samples on the right show the increasing blur, and rounding as the radius amount goes up. Click OK when you are satisfied with the shape. To take the blur from the outline we are going to adjust the levels, forcing the image to display mostly just white or black pixels. Choose Image>Adjust>Levels to open the Levels window. Move both the left and right triangles toward the middle triangle until the input levels are around 120, 1, 140. This is the setting that will give you the best result for most shapes, but there may be exceptions. You can see the results in your image as you adjust these values. You are trying to balance a crisp outline without blurring, but the corner pixels will require some blurring to prevent jagged edges. Click OK when you are satisfied with the look. Y Click on the RGB channel to return to document editing. Your selection is ready to fill. Since the channel is a saved selection, you can keep loading the selection over and over, especially handy for creating repetitive elements like buttons.
|
|
 |
Actions for rounded corners The samples at the left were created with these Actions. The final sample in the list was created from the original rectangular selection and the Very Round action applied twice. Start with a rectangular selection, highlight the Action for the desired rounding and play the Action. See Actions tutorial for more information about using and creating actions. Download Corners Action.
|
|
Classy Glassy Buttons Tutorial IndexClassy Glassy Buttons Start
|

 Choose
Fixed Size for the style and enter the desired size of your rectangle.
Click where you would like to place the top left corner of your line
and a marquee will be placed according to the dimensions you specified.
Choose
Fixed Size for the style and enter the desired size of your rectangle.
Click where you would like to place the top left corner of your line
and a marquee will be placed according to the dimensions you specified. ou
have now edited the channel, which is equal to a saved selection. To
bring this selection into active use in the document, you can click
on the Load channel as selection icon in the Channels window, shown
highlighted here. You can also choose Select>Load Selection and choose
Alpha 1 (if you have not renamed the channel).
ou
have now edited the channel, which is equal to a saved selection. To
bring this selection into active use in the document, you can click
on the Load channel as selection icon in the Channels window, shown
highlighted here. You can also choose Select>Load Selection and choose
Alpha 1 (if you have not renamed the channel). The
button shown here was created from the selection we have been working
with. I filled it with a 50% gray then a graduated black to transparent
fill at 30% transparency over the bottom third of the button. To finish
it off, I added a stroke (using the Alpha 1 selection) on a new layer
with an Outer Bevel and Inner Glow for Layer Effects.
The
button shown here was created from the selection we have been working
with. I filled it with a 50% gray then a graduated black to transparent
fill at 30% transparency over the bottom third of the button. To finish
it off, I added a stroke (using the Alpha 1 selection) on a new layer
with an Outer Bevel and Inner Glow for Layer Effects.
URL: https://www.webreference.com/graphics/
Created: Apr. 25, 2000
Revised: Apr. 25, 2000
 Find a programming school near you