Classy Glassy Buttons pg 4: Production Graphics with Wendy Peck at webreference.com
 |
Classy Glassy Buttons: PhotoShop Glass Buttons 2 | |
|
|
Add text Add your text ... nothing special here. We will work our magic with the text shadow. Choose the text layer and open the effects window. Make sure the Drop Shadow option is checked. Specify the following options: Opacity 40%, Angle 90°, Distance 3, Blur 6. These settings will be different depending on how your button lighting and depth is designed, but you must keep the angle and distance of the shadow in mind. |
|
|
|
|
|
|
|
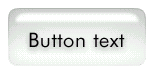
Color Reload the button selection. Select your background layer and create a new layer to receive the color. Set foreground color to the desired button color and fill the button selection. Your button now has the new color.
When you start to color your buttons, you will know exactly why I recommended everything go on a separate layer. Depending on the color, you may wish to adjust the highlight (size reduced here), the stroke (intensified). For realistic effects, you can also adjust the transparency of the highlight, to let a little color show through.
I have included the layers for the final button shown here. All layers except the color layer are the same for each button in this tutorial. The color changes, of course, and the effects icon only appears because I added a shadow to the last sample. |
|
|
|
|
|
|
|
This long explanation makes the method look tougher than it really is. Work through it a few times, and you will find that you can create dimensional glass very quickly, and will probably find yourself exploiting transparency in many other applications as well. This is a very nice little tool to have in your mind. |
|
|
|
|
|
Classy Glassy Buttons Tutorial IndexClassy Glassy Buttons Start
|
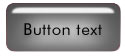


 Note:
If you would like your button to remain transparent to allow a background
to show through, select a much darker value of the color you desire
and adjust the opacity of the layer to get the correct color. See sample
here.
Note:
If you would like your button to remain transparent to allow a background
to show through, select a much darker value of the color you desire
and adjust the opacity of the layer to get the correct color. See sample
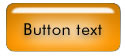
here.  In
the fuchsia button shown here, the highlight layer was reduced to 90%
opacity and the drop shadow on the text was changed to a dark fuchsia
I also increased the shadow intensity.
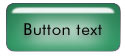
In
the fuchsia button shown here, the highlight layer was reduced to 90%
opacity and the drop shadow on the text was changed to a dark fuchsia
I also increased the shadow intensity.  Finally,
in the blue sample shown at the right, I added a drop shadow to the
color fill layer (the only layer with the full button shape). Glass
shadows will pick up some of the color from the glass. To change the
color of the drop shadow, click on the color chip in the Effects window
and choose the new color. Make sure the shadow has the same direction
as the rest of the shading in the button, 90° in this case.
Finally,
in the blue sample shown at the right, I added a drop shadow to the
color fill layer (the only layer with the full button shape). Glass
shadows will pick up some of the color from the glass. To change the
color of the drop shadow, click on the color chip in the Effects window
and choose the new color. Make sure the shadow has the same direction
as the rest of the shading in the button, 90° in this case.
URL: https://www.webreference.com/graphics/
Created: Apr. 13, 2000
Revised: Apr. 13, 2000
 Find a programming school near you