Classy Glassy Buttons pg 6: Production Graphics with Wendy Peck at webreference.com
 |
Classy Glassy Buttons: Glass Buttons in PaintShop Pro | |
|
|
Please read through the PhotoShop method for glass buttons. The method is slightly different, but the reasons for and construction of the shaping and dimension is the same for any glass object. The following is a straight how-to method. |
|
|
|
|
|
|
|
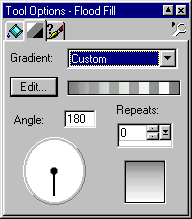
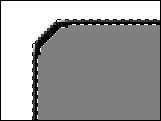
Fill background layer with white. Create a new raster layer. Create your rounded rectangle as desired for final outer shape. To get the correct shading for the button, you will have to build a custom gradient fill. Choose the Flood Fill tool from the toolbar to open the Flood Fill Options window. Choose Linear Gradient for fill style. Click on the middle tab to edit the gradient fill. Choose Angle 180 and click on the Edit button to open the Gradient Editor. Click on the color keys at the bottom of the sliders to make changes. Click on the left key to change the top color. Even though we will adjust transparency later, the best results will come with a dark gray rather than a black start to the fill. Click on the custom color well with the left key selected to change color. Click on the right key and choose white. Note the position of the center symbol above the slider. This controls where the color midpoint will be. With the color chosen, set the transparency. Click on the left key and specify the Opacity as 10. Click on the right key and specify Opacity as 0. The result is shown in the lowest window.
Click OK and return to the document. Click within the selection to create the initial fill. Check results and make any required changes. Delete or undo the previous fill before filling again. |
|
|
|
|
|
|
|
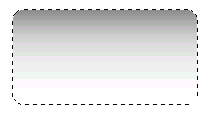
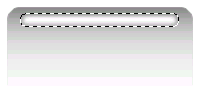
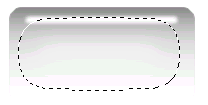
Create a new raster layer. Using the rounded rectangle selection, select an area for the highlight. Feather the section by 2 or three to blur the shape a little. Fill with white. (The samples here are shown as GIFs which is great for download time, but a little rough on graduated fills.) Create a new layer. To add the center highlight, create a rounded rectangle selection in the center of the button. Feather the selection with a value of 20. Fill the selection with white, set to an opacity of 50%. If the fill is not smooth, try Image>Blur>Soften to blend colors. To place an outline, it is best to create a temporary layer and create a temporary solid button to use for selecting a border. Create a new raster layer (Hint: call it Temp or something that will tell you to discard it once the outline is selected.) Load the button shape that your saved earlier. Fill with a solid color. Choose Selections>Modify>Expand and specify 1 pixel. Choose the Magic Wand tool and with CTRL key pressed, click on solid color to remove that area from the selection. You should have an outline area selected as shown at the left. Save the outline to an alpha channel. Delete the Temp layer. Create a new layer and fill the selection with black. Adjust layer opacity until you have the outline color you desire. |
|
 |
For the bottom shading, create a new layer. Gradient fills cannot be started from outside a selection in PaintShop Pro, so the lighter shaded areas at the bottom of the button must be added by hand. Load the button selection. I achieved the best results with the Airbrush tool set to size 30 and opacity 5, working with a dark gray foreground color. To finish, reduce the layer opacity to approximately 50% or to where the shading looks soft and realistic. Select the Stoke layer and choose the eraser. Set opacity to 30% and remove most of the outline from the bottom and lower sides of the button. |
|
|
|
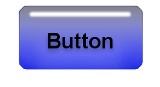
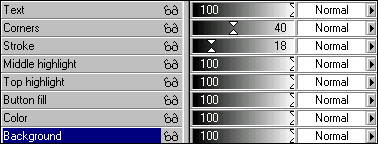
Add text That's it. Your first glass button is complete. Add color The layer window for the colored buttons is shown here.
This is just a tiny sample of what you can do with glass buttons. Experiment with different shapes. Perhaps a dingbat can provide the perfect shape for your glass buttons. (See Dingbats.) Have some fun, and put glass to work on your site. |
|
|
|
|
|
|
|
Classy Glassy Buttons Tutorial IndexClassy Glassy Buttons Start
|


URL: https://www.webreference.com/graphics/
Created: Apr. 25, 2000
Revised: Apr. 25, 2000
 Find a programming school near you