WebReference.com - Part 1 from Chapter 11 of Cascading Style Sheets A Beginner's Guide, from Osborne/McGraw-Hill (6/6)
[previous] |
CSS: A Beginner's Guide
Project 11-1: Create a Simple Layout with Float and Clear
The float and clear properties are undoubtedly the easiest means by which you can affect the positions of boxes on your page. While you may not have as precise control as you would with absolute and relative positioning (covered in the next section of this module), you also don't have to learn very much about positioning schemes. Since the browser applies the rules governing floated and clear boxes, most of the actual positioning is out of your hands. In this exercise, you will use the float and clear properties to manipulate one image and four paragraphs.
Step-by-Step
1. Create an HTML document and save it as float_and_clear.htm.
2. Find an image you would like to use (or download the one used in this project from Osborne's Web site: https://shop.osborne.com/cgi-bin/osborne/007219295X.html) and insert it into your HTML code using the <img /> element. You can set the dimensions to whatever you'd like. The width and height attributes for the image used in Figure 10-1 are set to 125 and 181 pixels, respectively.
3. Create four separate paragraphs using the <p> element. Put whatever
text you
want into these paragraphs or copy from the code that follows these steps.
4. In the <head> portion of the page, add a set of <style> tags.
5. Write a style rule that sets the body text to display as bold face.
6. Make the paragraph boxes easier to see by setting their background colors to something different than your browser's default page background. Set the backgrounds to "white" if you are using Internet Explorer or to "cyan" if you are using Netscape or Opera.
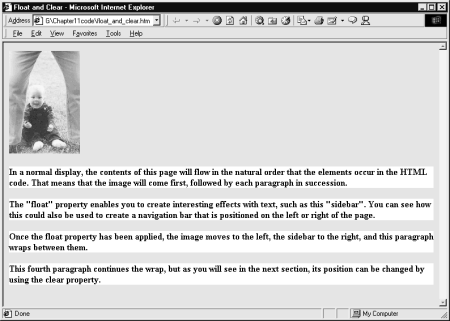
7. Save the page, and display it in a browser. It should resemble Figure 11-1.

Figure 11-1 An image and four paragraphs
8. Set the font size for the entire document to 1.1 ems.
9. Set the float property for the image to a value of "left."
10. Create a class and name it "sidebar." Set the float property for the sidebar class to "right." Also, set its background color to blue, the text color to white, the width to 25%, and the font to 1em.
11. Apply the "sidebar" class to the second paragraph by using the class="sidebar" attribute inside that paragraph's opening <p> tag.
12. Create another class and name it "caption." Set the clear property of the caption class to "left."
13. Apply the "caption" class to the fourth paragraph by using the class="caption" attribute inside that paragraph's opening <p> tag.
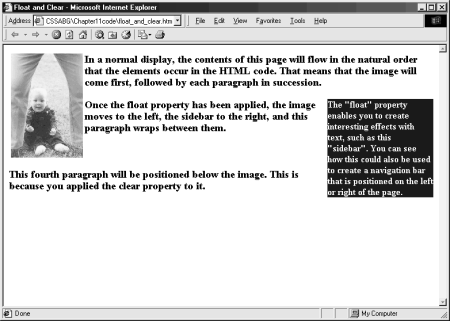
14. Make the paragraph boxes (except for the sidebar) disappear by either removing the background-color attribute from the "p" selector or by setting the body background color to match the paragraphs. Save your page and view it in a browser. It should resemble Figure 11-2.

Figure 11-2 A simple layout created with float and clear
Project Summary
This layout, created only with float and clear, is simple and uncomplicated. Of course, you could do more to change the appearance of the page by manipulating margins and padding and even by adding borders. In fact, you may want to go back into this page and experiment a bit. Try adding a right margin to the image or a left margin to the sidebar, and vice-versa. As you play with the different properties and manipulate the positions and sizes of boxes, you can begin to get a feel for how you might use these properties in creating attractive layouts for Web pages.
<html><head><title>Float and Clear</title>
<style>
body      {font-weight: bold; background-color: white;}
img       {float: left;}
p         {background-color: white; font-size: 1.1em;}
.sidebar  {background-color: blue;
           color: white;
           width: 25%;
           font-size: 1em;
           float: right;}
.caption  {clear: left;}
p         {background-color: white}
</style></head>
<body>
<img src="cjp250x361.jpg" width="125"
     height="181" alt="CJ" />
<p>In a normal display, the contents of this page will flow
   in the natural order that the elements occur in the HTML
   code. That means that the image will come first,
   followed by each paragraph in succession.</p>
<p class="sidebar">The "float" property enables
   you to create interesting effects with text, such as
   this "sidebar". You can see how this could
   also be used to create a navigation bar that is
   positioned on the left or right of the page.</p>
<p>Once the float property has been applied, the image
   moves to the left, the sidebar to the right, and this
   paragraph wraps between them.</p>
<p class="caption">This fourth paragraph will be
   positioned below the image. This is because you
   applied the clear property to it.</p>
</body></html>
[previous] |
Created: July 8, 2002
Revised: July 8, 2002
URL: https://webreference.com/authoring/style/sheets/beginners/chap11/1/6.html


 Find a programming school near you