WebReference.com - Part 1 from Chapter 11 of Cascading Style Sheets A Beginner's Guide, from Osborne/McGraw-Hill (5/6)
[previous] [next] |
CSS: A Beginner's Guide
Simple Layout with Float and Clear (CSS 1)
One of the easiest ways to create layouts by manipulating boxes is with the float and clear properties. These properties, which were part of the CSS 1 specification, enable you to move boxes sideways and control how other boxes wrap around them. As you begin to work with float and clear, you may find that they remind you of HTML's "align" attribute.
The Float Property
In HTML, it is possible with the "align" attribute to cause an image to move to the right or left of a Web page, causing text to wrap to one side of the image. CSS 1 took that concept, which previously had applied only to images, and applied it across the board. With the float property, it is possible to arrange any of the boxes on a page so that they will float to one side of the page, with content wrapping to the other side. One obvious use of the float property is with images. However, the float property can also be used to create "sidebars," side navigation bars, even double-column layouts.
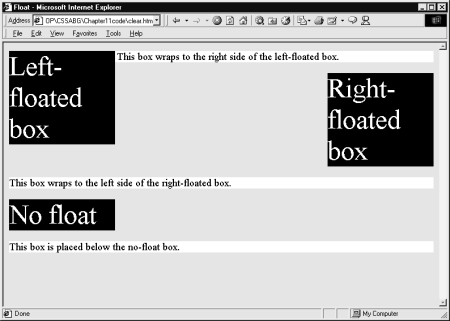
Float will accept only keyword values of "left," "right," or its default value of "none." Thus, the syntax for float is straightforward. If you want to cause a selector's box to float to the left, with content wrapping to the right, simply specify the selector and add the declaration, "float: left;". For a right-side float, the declaration would be, "float: right;". As the following illustration demonstrates, the float property can create some interesting results:
<html><head><title>Float</title>
<style>
.lgtxt     {font-size: 3em;
            background-color: black;
            color: white;
            float: left;
            width: 25%;}
.lgtxt2    {font-size: 3em;
            background-color: black;
            color: white;
            float: right;
            width: 25%;}
.lgtxt3    {font-size: 3em;
            background-color: black;
            color: white;
            float: none;
            width: 25%;}
p          {background-color: white;
            font-size: 1.1em;}</style></head>
<body>
<p class="lgtxt">Left-floated box</p>
<p>This box wraps to the right side of
   the left-floated box.</p>
<p class="lgtxt2">Right-floated box</p>
<p>This box wraps to the left side of
   the right-floated box.</p>
<p class="lgtxt3">No float</p>
<p>This box is placed below the no-float box.</p>
</body></html>
Notice how the various floats interact with each other. As you try to follow the interaction of the different boxes in the example, remember that the elements are all presented on the page in the order that they occur in the HTML code. Their positioning is determined by the rules that govern floats (See "Ask the Expert"). Table 11-4 lists some other important characteristics of the float property.
Does it inherit? |
Default value |
Browser support |
Works with |
No |
None |
Inconsistent |
Any elements except positioned elements and generated content. |
Table 11-4 Characteristics of the Float Property
Ask the ExpertQuestion: What are the rules that govern the behavior of a floated box? Answer: The rules get pretty complicated, but stated as simply as possible, they are
|
The Clear Property
As you work with the float property, you may find times when you want to float an element's box to one side or another, but you want to prevent other boxes from wrapping around the floated box. You use the clear property to accomplish this. As you might expect, the clear property accepts the same values as float: "left," "right," and "none." To see the impact of the clear property on a layout, try making one change in the code for the previous illustration. Add the declaration "clear: right;" to the "p" selector. When you save it and display it in your browser, it should look like this:

The middle paragraph block now drops down below the "right-floated" box, because it (the paragraph block) has a value of "clear: right." In other words, the "clear: right;" declaration will not permit floated content on the right side of that paragraph. Thus, the paragraph is repositioned below the right-floated box. Table 11-5 lists some other important characteristics of the clear property.
Does it inherit? |
Default value |
Browser support |
Works with |
No |
None |
Inconsistent |
All except positioned elements and generated content |
Table 11-5 Characteristics of the clear Property
[previous] [next] |
Created: July 8, 2002
Revised: July 8, 2002
URL: https://webreference.com/authoring/style/sheets/beginners/chap11/1/5.html


 Find a programming school near you