WebReference.com - Part 1 of Chapter 7 from Essential Blogging. From O'Reilly (4/5).
[previous] [next] |
Essential Blogging, Chapter 7: Advanced Radio UserLand
Categories
The Categories feature, which is disabled by default in Radio, lets you segment and organize your blog into different types of content. For example, you might write a blog that mentions your work but also talks about your personal life and your hobbies. You could create categories for Work and Play, then assign each blog post to one category or the other. Radio then automatically creates separate index pages (which can be separately themed) for each category.
Although you can create your own categories, Radio includes several predefined categories: Home Page, My Hobbies, My Organization, My Friends, My Interests, and My Profession. By default, everything is tagged for Home Page. You can turn it off if you want, but the custom for categorized blogs is to have the home page include everything.
If you are trying to blog information that you don't want most people to see, turn off the Home Page category and send people that need the contents the URL of the category. These are some example category URLs:
https://www.fuzzyblog.com/categories/
https://www.fuzzyblog.com/categories/marketing101/
Enabling categories
By default, categories are turned off in Radio. The Prefs screen lets you turn them back on. Click on Prefs in the Radio command bar. Under the Blog grouping, click on Categories, then check the box for categories. Click Submit, then reload the new blog entry page.
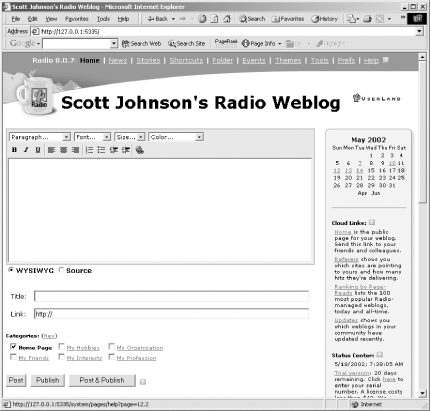
At the bottom of the editing area, above the Post to Weblog button, are six checkboxes that, when selected, assign something to one or more categories. You will also see that the Home Page category is selected by default. This is shown in Figure 7-3.

Figure 7-3: Categories for new blog entries
Creating your own categories
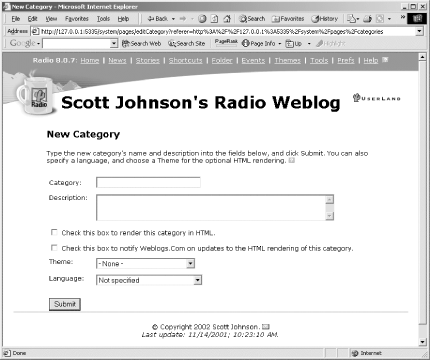
Although Radio has built-in categories, you probably want to create your own that are better suited to the needs of your blog. To create a new category, click on Prefs in the Radio command bar. Under the Blog grouping, click on Categories, and then follow the New Category link. This gives you the New Category options page shown in Figure 7-4.

Figure 7-4: Creating new categories
Enter the name of the category. This can be anything you like, including multiple words, provided that it doesn't conflict with an existing category. It is recommended that you use only letters, numbers, and spaces for category names. Fill out the category description.
Turn on the Render as HTML option as needed. This controls whether or not Radio builds a full home page and calendar entries for your category. This really treats your category as a blog within a blog. You generally turn this on only when you want people to go directly to your category and see the rolling group of entries. In other words, you turn this on when people use a category as a destination within your blog in and of itself. If you just want people to see your category from an RSS feed or linked to from your home page, leave this option off.
Turn on the Notify option as needed. Normally, whenever you post an entry to your blog, Radio notifies the central server at weblogs.com of your update, allowing others in the blogging community to see your update. If you are using categories to segment your blog so that material stays private, you want to leave this option off.
Select a theme for the category. Radio defaults all new categories to the default theme, so if you aren't using the default theme for your blog then you probably should select a theme for the category.
Select the language in which your blog is written. Click Submit to create the category.
When you refresh the New Blog Entry page, you should see a new category at the bottom of the screen listed with the other existing categories that Radio supplies by default.
NOTE
There is a New link above the categories, listed on the home page. You can also use that link to create a new category with fewer steps.
Assigning posts to categories
If you have Categories turned on, before you publish your post, select the categories to which you want to assign the post and click Publish. Edit old posts to assign them to the new category.
Advanced categories
Although additional information on categories is beyond the scope of this chapter, you should be aware that Categories is a very powerful, very extensible feature. Categories are how you make multiple blogs from Radio. Each blog can be represented by a category, and postings can be routed to different blogs just by selecting the category that represents the destination blog. This is a powerful content management feature built into every copy of Radio.
[previous] [next] |
Created: October 7, 2002
Revised: October 7, 2002
URL: https://webreference.com/authoring/blogging/chap7/1/4.html


 Find a programming school near you