WebReference.com - Part 1 of Chapter 7 from Essential Blogging. From O'Reilly (2/5).
[previous] [next] |
Essential Blogging, Chapter 7: Advanced Radio UserLand
Radio Techniques
This section explains some of the quick things you can do with Radio. Among the topics covered in this section are shortcuts, publishing to your blog via email, learning to use Radio's automatic updating, republishing your entire blog, and backing up your Radio data.
Shortcuts
Shortcuts are a unique feature in Radio that makes entering content into your blog postings easier, faster, and more accurate. Shortcuts replace quoted text (e.g., "tds") with other, generally longer, text ("The Daily Show with Jon Stewart"). The text in quotes is the shortcut's name.
Shortcuts can include full HTML content, such as an image reference, a URL, or both. When you are writing or editing a blog post, you see the name of the shortcut not its value. When Radio publishes your posting to your blog, the shortcut's name is replaced with its value. Shortcuts can be changed globally across all blog entries just by completely republishing your blog. Instructions on how to republish your entire blog are at the end of this section.
Automatic shortcuts
An automatic shortcut is created when you publish a blog entry with a title. Radio automatically takes that title and makes a shortcut out of it. For example, if you published a book review of Perl programming books that had a title of Perl Books you could always create a link to that post by putting "Perl Books" into a blog entry.
To prevent the "Perl Books" shortcut from being expanded, put backslashes in front of the quotes:
\"Perl Books\"Radio treats backslashed quotes as literal quotes, so the string that appears in your final blog is simply "Perl Books" and not a link to the Perl Books post.
Creating your own shortcuts
You can also create your own shortcuts. Your own shortcuts can, for example, convert text into URLs, insert boilerplate, and even insert the HTML code for images. For example, my shortcut "virgil" inserts a picture of my cat Virgil and the shortcut "fuzzyweb" inserts a link to my web site, https://www.fuzzygroup.com.
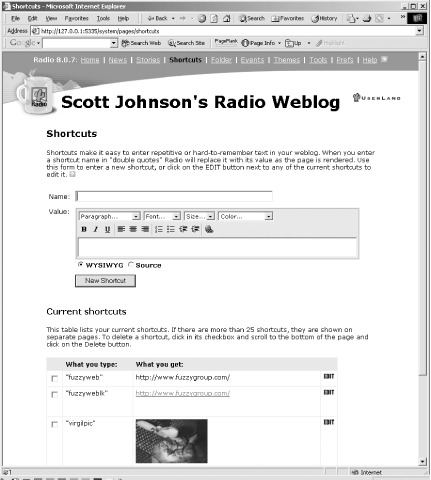
To create your own shortcut, click on Shortcuts in the Radio command bar. This displays the Radio Shortcuts screen, shown in Figure 7-1.
In the Name field, enter the name of the shortcut. This is the text you type, enclosed by quotation marks, that inserts the body of the shortcut in your web page when it is published. You do not need to type the quotes.
In the Value field enter the body of the shortcut. This can include URLs, pictures that you paste into the WYSIWYG editor, plain text, and more. You can also customize the HTML code for the shortcut by source editing the entry.
To save the shortcut, click the New Shortcut button. This saves your shortcut and displays the list of all shortcuts below the value field. If you need to change the shortcut, click the Edit button. If you need to delete a shortcut, select the checkbox on its left and click the Delete button.
A useful tip for creating shortcuts is using a consistent naming style. For example you might use "donkeypic" for a picture of a donkey and "donkeylk" for a link to the Donkey site.
[previous] [next] |
Created: October 7, 2002
Revised: October 7, 2002
URL: https://webreference.com/authoring/blogging/chap7/1/2.html


 Find a programming school near you