3D Animation Workshop: Lesson 98: Skinning a Character Skeleton
|
|
Lesson 98 - Skinning a Character Skeleton - Part 1
I wasn't at SIGGRAPH last week. Your humble servant was plugging away, writing a book on Shout3D (the amazing Web 3D technology) for a September 1 deadline. But I've been listening in the background to the cacophony of corporate announcements drifting out of New Orleans. For one, Shout Interactive, the creators of Shout 3D, are merging with another firm to create a more substantial enterprise with larger resources. We'll certainly be seeing a lot of this kind of consolidation as the Web 3D market begins to mature.
Perhaps the biggest news I've heard was the announcement that 3D technology from Intel will be incorporated into Macromedia's Shockwave. Next to putting 3D rendering directly into Microsoft Internet Explorer, this would be most powerful way to jumpstart 3D graphics on the Internet, and has been expected by many people for a long time. I'll be investigating this development and will get back to you with more.
Let's get back to the subject of boning a character figure in 3D Studio MAX. In the last two lessons we boned a simple mesh and considered the operation of inverse kinematics in MAX. Make sure you go over those two lessons before continuing with this one.
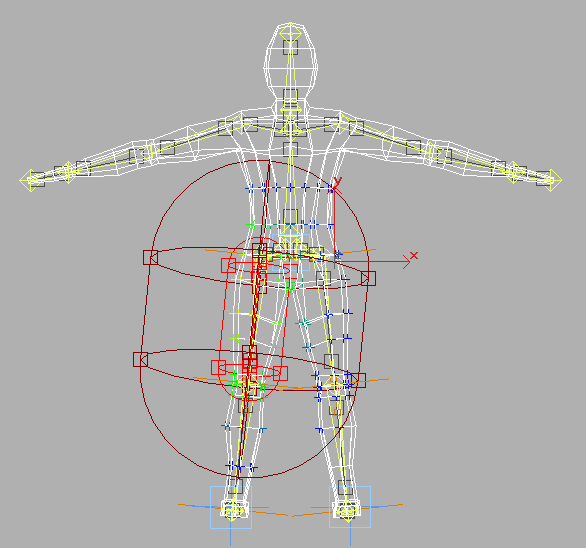
Once you've finished a working skeleton, it's time to attach it to the mesh. With the skeleton properly positioned inside the mesh, we select the mesh and put a Skin modifier on the modifier stack. Using the Add Bones command, you select all the Bones in the skeleton. The moment you do this, MAX will associate all of the vertices of the mesh with specific bones on the basis of default weighting envelopes. In the following image, we see the default vertex weighting for the Bone running through the character's right thigh.

To say that a vertex is "weighted" with respect to a Bone means that the vertex will move as the Bone is rotated in order to stay aligned with it. At 100 percent weighting, the vertex follows the Bone rigidly. At 50 percent weighting, the vertex moves only half as much as the Bone does. MAX indicates weighting values by spectral color-coding (in the same manner as in the Soft Selection tool for mesh editing, which is precisely the same concept). A red vertex is 100 percent weighted to the selected Bone. The lowest amount of weighting is signified by blue. Between these extremes are various hues of yellow and green, and completely unweighted vertices remain white.
Note how the brown outer envelope defines the limits of vertices weighted for the selected bone. The default envelope is so large that it captures many vertices that are far outside the thigh. This problem will be true for the entire skeleton. Thus our task is to refine the vertex weighting from its default state to produce a result that deforms correctly when the Bones are rotated.
| To Continue to Parts 2 and 3, Use Arrow Buttons |
|
Created: July 31, 2000
Revised: July 31, 2000
URL: https://webreference.com/3d/lesson98/


 Find a programming school near you