3D Animation Workshop: Lesson 72: A Challenging Model | 2
|
|
Lesson 72 - A Challenging Model - Part 3
The bridge was a huge trimming challenge. Trim curves are generally created by drawing the profile curve and then projecting that curve onto the surface for trimming. The projection process can get easily screwed up when the curve to be projected turns lots of detailed and sharp corners. I wanted to see if I could trim out the whole surface at once, without having to work in halves, and I succeeded after a lot of experimentation. I found that slight changes in the complexity of the profile curve greatly affected the accuracy of the projection. I also needed a second trim for the hole in the middle. After creating one finished surface, I mirrored it to create the back, and connected the trim curves on both with surfaces. Note the guideline showing where the bridge meets the surface of the body. The bulge below this line would be hidden inside the instrument and could be ignored.
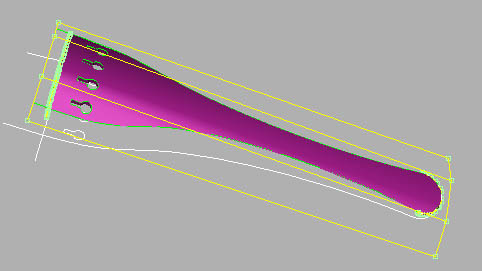
The tailpiece was another serious trimming exercise. Like the violin body, I needed to apply both inner and outer trims to a bowed surface. But unlike the body, none of the curves was extremely complex, so I was able to apply multiple trims without resorting to halves. I used two separate curves for the profile, to prevent having to turn any sharp corners. Then I trimmed out four identical holes. This meant a total of six trims! But it worked because none of the trims was especially complex.
The strings were tedious work, but the concept was easy. I extruded a tiny circular NURBS curve along a path defined by another NURBS curve in a process called a rail sweep in MAX. This method provided considerable flexibility. I could change the gauge of the strings by scaling the size of the circle. And I could edit the path curve to carefully fit the strings through the holes in the tailpiece, over the bridge and the nut on the fingerboard, and finally wrap each one around a peg in the peg box.
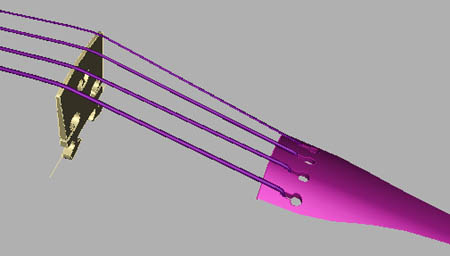
I had organized the pieces into separate files for clarity and faster interactive response, and periodically brought them together to assess the bigger picture. Even with all my care, they did not all match up perfectly in the end, so I made a variety of scaling adjustments. When all was done, the finished geometry looked like this, ready for materials and textures.

It took me four or five whole days to complete this project, mostly because of all the planning and experimentation. I could probably rebuild the whole thing, even better, in a single day, with the benefit of hindsight. But these skills are cumulative, and with every new model you learn how to work faster and more effectively, mostly because you develop superior instincts and strategies.
| To Return to Parts 1 and 2, Use Arrow Buttons |
|
Created: August 2, 1999
Revised: August 2, 1999
URL: https://webreference.com/3d/lesson72/part3.html
 Find a programming school near you