3D Animation Workshop: Lesson 72: A Challenging Model
|
|
Lesson 72 - A Challenging Model - Part 1
I've been finishing up my upcoming book on 3D Studio MAX 3 (3D Studio MAX 3: In Depth, published by the Coriolis Group), and looking back over the mountain of text has got me thinking about how people really learn 3D graphics and animation. To be sure, there's a huge amount of intellectual matter to master. You have to know the powers of the program and the details of the interface. But from an artistic standpoint, you have to develop instincts and methods that make creative work possible.
These instincts and methods can be taught, or rather, they can be learned, by observing how other people work. The most important element in my view, for all artistic work, is the ability to conceive of a project as a whole, and in a general way. 3D graphics is a highly strategic exercise. To be effective and produce professional quality work, you need to be able to assess the entire scope of a project before you begin and weigh your strategic alternatives. Again and again, I discover that decisions made early in the process restrict my freedom later on. You've got to learn how to proceed from the general to the specific, so that you are free to add detail later on without working yourself into a corner.
In that spirit, I like to share my thinking as I developed a model of a violin for the book. This is a NURBS model, and I offer it in part to help convince the general public of the enormous importance of this method of modeling, which well repays the considerable effort required to learn it. This model was done in Studio MAX, but there is nothing about the process that is unique to that program. The same approach could be used in any other NURBS modeling environment.
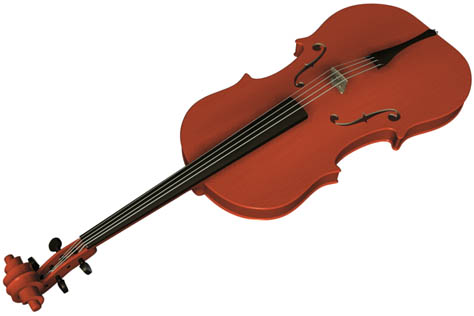
Here is the finished violin. I modeled it from life, with the violin at my side, and without the use of scans or traced construction lines. That helped give it a free, interpretive feel, and those who know string instruments well will certainly notice some small departures from absolute fidelity in the spirit of fun.
I began by identifying the major units of the project that could be handled separately; the body, the neck (including scroll and fingerboard), the bridge, and the tailpiece. The body was the largest object and therefore the best place to start. The best way to proceed was by trimming a flat surface with an outline profile, and then applying a second trim to cut out the f-holes. These are both very sophisticated trims, and I anticipated that the program would not be able to handle trimming both f-holes and the border trim at once. This turned out to be correct. So I was forced to model only half of the surface, so that I needed only one f-hole trim in a single surface.
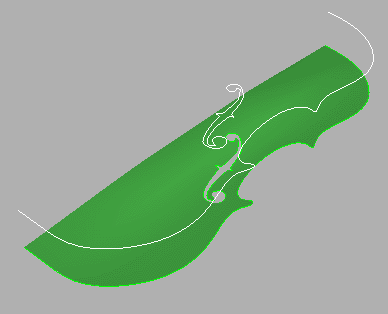
But this approach surface had its own disadvantages, because there is a slight swelling (the "belly") in the surface. It took a lot of care to create this bulge in a way that would not produce a visible seam down the middle when aligned with a duplicate half.
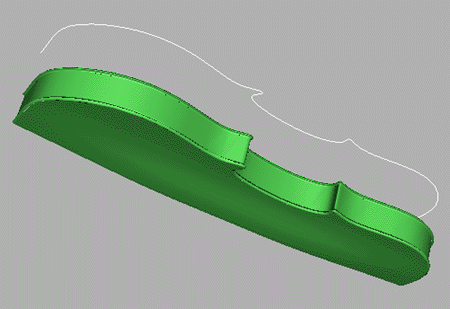
The top (half) surface was then mirrored to produce the back of the instrument, and the trim curve was extruded to make the connecting side panel. Making the overhanging lips that connected the side panel to the top and bottom surfaces required a lot of experimentation. These lips were built from blend surfaces to assure continuity, but needed to be constructed in small units that were later joined together.
| To Continue to Parts 2 and 3, Use Arrow Buttons |
|
Created: August 2, 1999
Revised: August 2, 1999
URL: https://webreference.com/3d/lesson72/
 Find a programming school near you