3D Animation Workshop: Lesson 70: MAX NURBS--Finishing the Piston | 2
|
|
Lesson 70 - MAX NURBS--Finishing the Piston - Part 3
It was now time for texturing and rendering. Since rendering NURBS necessarily involves tessellating the free-form curved surfaces into polygonal meshes, we experimented with the surface approximation tools that I covered back in Lesson 66. In the end we went with the default medium setting, which uses both curvature and spatial approximation methods.
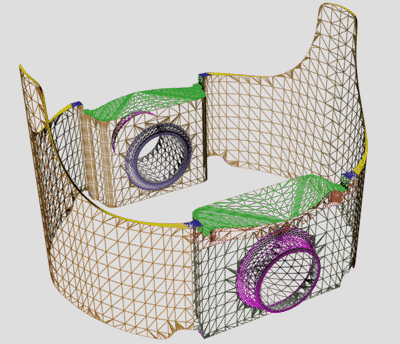
The image above is a wireframe render that reveals the tessellation, and it's worth a serious look. Note the small triangles that ring the purple hub, connecting it seamlessly to the flat surface. The tessellation is well balanced just dense enough to follow the curvature of the surfaces. The only trouble spots are on the green "platforms." The lofts from which these were created involved curves that turned sharply, generating dense and twisting regions of surface CVs. The results rendered well enough to ignore, but the problem could have been corrected by deleting the surfaces and lofting each one in two or three separate units.
The main texture was developed from a photograph that Dino made of an actual piston. Like most such textures, it required a lot of tweaking in Photoshop to create a workable result. The following image was applied to the rounded outside surface of the NURBS model using the implicit uv coordinates of the surface itself.

A dark, but rusty, texture was also developed from a photograph and was applied to the rest of the remaining outside surfaces using their implicit mapping coordinates. This ensured that the texture would follow any curved surfaces smoothly. To get a metallic look for the top and bottom edge surfaces, we used a texture map created in Photoshop with fine dark "scratch lines" against a white surface. This map was used both for the diffuse color and to map specular intensity. This is a standard technique to create a brushed metal look We found, however, that the scratches looked funny if they followed the inherent surface curvature, so we used a vertical planar projection. NURBS provide tremendous freedom in texture mapping.
Take a look at the final textured version.
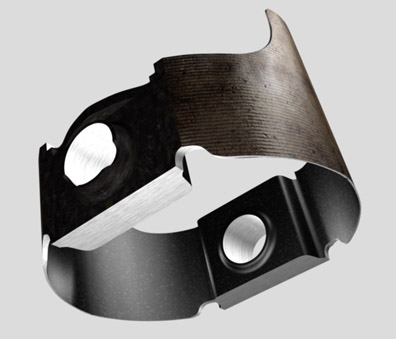
The inside surface was mapped with a procedural texture to give it some pleasing color variation. Observant viewers will note that we added notches to the outer hubs, using trim curves. All in all, Dino and I felt that MAX NURBS, as implemented in the new MAX 3, are powerful and workableÂeven exciting. But the number of hours required to develop even a basic level of mastery is considerable. If you're ready to devote well over a hundred serious hours to get started with this toolset, you'll be on your way.
| To Return to Parts 1 and 2, Use Arrow Buttons |
|
Created: July 3, 1999
Revised: July 3, 1999
URL: https://webreference.com/3d/lesson70/part3.html
 Find a programming school near you