3D Animation Workshop: Lesson 69: MAX NURBS--The Piston Project | 2
|
|
Lesson 69 - MAX NURBS--The Piston Project - Part 3
Closing up the bottom was a real challenge. The two trim curves followed complex paths and MAX couldn't effectively skin between them. The answer was to break the curves into three smaller pieces to create three separate surfaces. As mentioned above, you can't actually break the trim curves themselves or you'll kill the surface trims. Rather, you have to break up copies of the trim curves and skin between these copies. MAX has some clever ways for handling this problem, but be prepared for a little frustration in the learning process. But, since we were only skinning from copies, we were able to make the three surfaces independent and delete the curves from which they were skinned. You've got to get rid of curves you don't need at every possibility or your model becomes unmanageable. Two of the three surfaces could be joined without damage, leaving only two surfaces for the bottom. The result in a test render looked pretty clean.
At this point, Dino and I were satisfied that we understood the trouble spots and how to deal with them, so we rebuilt the model from the original curves. One big issue was how the surfaces should be divided for texture mapping down the road. You really have to think ahead on this. But the major difference in this new pass at the model involved working in the sophisticated "lip" on the front of the object. The outside surface curve was divided into two, so that two separate surfaces could be extruded from it. One continued down the full height of the object, but the other extended only to the edge of what was to become an overhang.
Creating the underside of the overhanging lip was difficult and required a lot of experimentation. Once again, we found that MAX didn't like skinning the entire length of the curves. We had to cut the two curves defining the underside of the lip into three units, and skinned between only two pairs of these. This produced a clean result composed of two surfaces.
We were then able to extrude down to create a flat surface beneath the lip.
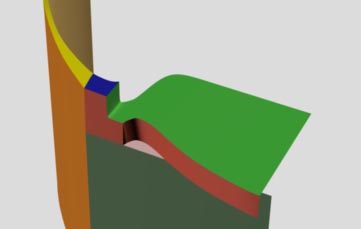
After extruding an inside surface and trimming it, we applied the second trims to the both inside and outside surfaces. Closing up the top was now a complex problem. It was solved in much the same way (though with a lot more trouble and experimentation) as we closed up the bottom on the experimental version. Taking care not to cut any active trim curves, we cut up copies of these to make workable units for skinning. This produced the surfaces in yellow and green. An empty hole remained between these, so we built two little bridge curves and skinned between them to create the blue patch. After a lot of careful tweaking of CV locations, the result rendered nicely.
We'll finish this up in the next lesson.
| To Return to Parts 1 and 2, Use Arrow Buttons |
|
Created: June 21, 1999
Revised: June 21, 1999
URL: https://webreference.com/3d/lesson69/part3.html
 Find a programming school near you