3D Animation Workshop: Lesson 57: Getting Started with Character Animation
|
|
Lesson 57 - Getting Started with Character Animation - Part 2
Bones are objects that are used to create a "skeleton" inside the mesh. They are intensely hierarchical. In other words, they are all parented to each other so as to create a coherent system. If we twist the spine bone, we want the entire upper body to move along. If we rotate a thigh up to take a step, we want the calf and the foot to move with it. Take a look at this skeleton arranged in the finished mesh.

The entire system is tied together with a root bone placed in the center of the pelvis. It's kept very tiny because it serves no function other than as an anchor and will not be used to deform the mesh. It's highlighted in yellow (if you can see it). Three chains are connected together here. In the lower body, a chain of hip, thigh, calf and foot bones extends down the left side, and again on the right. The third major chain is the upper body. A spine bone heads up from the root, but then breaks into three subchains. To the right and left are shoulder, upper arm, lower arm and hand bones. Extending straight up are a neck and head bone chain. This set-up is standard and mimics the way our own bodies are connected.
So how do these bones affect the mesh? Once they are all in place (and have been properly named), they are activated. Prior to activation, moving or rotating a bone does not affect the mesh, which is important because we want to be able to arrange the bones freely before they take effect. However, once they are activated, the bones seize control of vertices on the mesh, and the way that they do so determines how the mesh will deform when the bones are rotated. Every program has a different way of handling this. Lightwave's is the simplest because there are the fewest controls, which can be both a blessing and a curse. Bones take control of vertices based on their distances from those vertices, and most vertices are influenced by more than one bone. This creates a smooth pulling and bending characteristic of muscles.
Here we rotate the right thigh bone up and the mesh follows. Note how the children bones in the chain (the calf and foot) move along with the thigh.
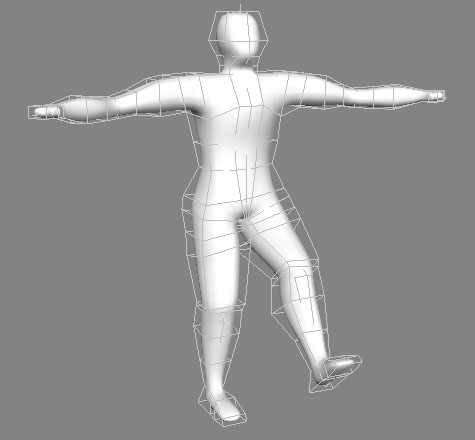
Animating the finished mesh, however, is not the most desirable approach, for a number of reasons. The final, triangulated mesh is typically so dense that it's hard to see the bones and the mesh at the same time. Here is the same mesh in wireframe (instead of the "dust") view. It can be very tough to work like this.
But an even more important factor is the smoothness of the mesh deformation. In true NURBS deformation, the bones move the NURBS control points of the surface rather than vertices of the final mesh. Thus the curvature of the mesh is always being recalculated. Lightwave simulates this result with polygons in a remarkably intelligent way. Using the MetaMation tool, we can animate our original low-poly "cage" object, and allow it to smooth (subdivide) frame-by-frame in the animation. This is how it works.
Here is the same skeleton inside our original 244 quadrangle "cage," before smoothing. Animating this model is easy and its positioning is clear. Another advantage is that the animation of this low-poly model can be easily previewed in something close to real time. Using the finished mesh, the preview speed would be impossibly slow because there are 30 times as many vertices to calculate on each frame (and this is a very simple model).
At each frame, after the cage has been deformed, it's subdivided in just the same way that we used to create the final mesh in Lightwave Modeler. We can even preview the subdivided version, called the "meta" version, inside the cage. This makes for excellent visualization.
| To Continue to Part 3, or Return to Part 1, Use Arrow Buttons |
|
Created: Jan. 5, 1999
Revised: Jan. 5, 1999
URL: https://webreference.com/3d/lesson57/part2.html
 Find a programming school near you