3D Animation Workshop: Lesson 52: Low-Polygon Modeling
|
|
Lesson 52 - Low-Polygon Modeling - Part 2
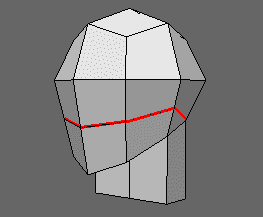
We've gone as far as we can with this amount of geometry. The most important features in the shape of the human face are the brow and the nose. We'll keep our present upper row of quadrangles for the brow. The vertical edges in the front lower portion can be divided, and the points connected up to create a new horizontal row of edges. This will allow us to define the nose.

Let's straighten out these new edges and adjust them upward into position to align with the tip of the nose. The edges defining the brow line are adjusted upward as well.

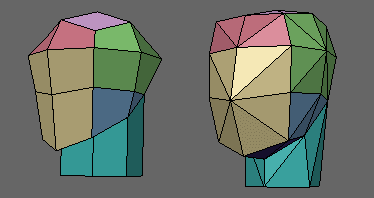
Now we can start triangulating. If we think in basic contour groups (indicated here by color) we can divide the objects explicitly into triangles by connecting the dots and tweaking points into better positions. Examine these images carefully to understand how it's done.


We are now up to 66 triangles, but this is finally beginning to look like a head. Take a moment to consider how basic contours can be defined with triangles. A general rounding down from a central point is achieved with a ring of 8 triangles, as here on the top (lavender), sides (green), and lower front (tan) of the face. Contrast the back of the head (burgundy), which also uses a ring of 8 triangles, but relies on a crease from the middle point to the bottom one to create a transition into the neck. Note the contoured panel of 3 triangles in the cheeks (blue). A contour panel of 4 triangles defines the brow, and an identical one wraps under the chin, but is not visible in this images. Try to imagine it by connecting the visible points. The front and back contours of the neck use every edge for maximum effect.
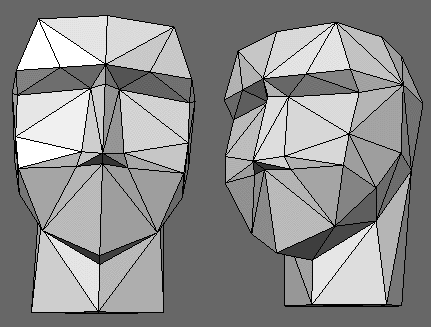
Thus far, the nose and brows are only suggested by contours. To get some real definition into these critical features we need some sharp angles. The virtue of the model we have built thus far is that it is modular. We can begin to work on the face without worrying too much about the other units.
The human nose emerges from the brow, and juts in at the bridge before angling out to the tip of the nose. The bridge of the nose lines up with the eyes. To achieve this we create a new row of edges where the bridge-eye line should be and connect these up to the temples on both sides of the head. This new row is connected above to new points created on the brow, and then pulled back into the head. The nose requires two further points in this row, and on the row passing through the tip of the nose. Connecting these up (with a lot of experimentation) created the opportunity for some basic nostril flare.

These improvements bring our model up to 98 triangles. Of the additional triangles, probably half were added to define the new features, and the other half were necessary to connect up with all the existing features. We did a good job here. Only a few extra edges were created outside the face itself, and after a lot of point moving, all of the additional faces created in the process were aligned so that they provide additional contours. This is an important aspect of low-poly modeling. New points created to add new features generate new polygons in other than the intended directions. Try to make all your new faces work. It's a balancing act.
| To Continue to Part 3, or Return to Part 1, Use Arrow Buttons |
|
Created: Oct. 27, 1998
Revised: Oct. 27, 1998
URL: https://webreference.com/3d/lesson52/part2.html


 Find a programming school near you