3D Animation Workshop: Lesson 47: More Radiosity Magic webreference.com
|
|
Lesson 47 - More Radiosity Magic - Part 2
Ray tracing is a rendering method common to all high-quality 3-D applications. I don't want to get into the details of this imposing subject here, but the basic concept is easy to understand. Certain effects can only be rendered using a method that tracks light rays through the scene and follows their bounces. Ray tracing produces very sharp and accurate shadows, but is especially important for reflections. When you look into a mirror, you see the reflections of objects whose reflected light is bouncing off the mirror into your eyes. If you change your viewing position, the reflections in the mirror change accordingly. Ray tracing can precisely simulate this effect.
Lightscape allows the user to overlay a ray-traced refinement over the original radiosity solution. We'll first use it to improve the shadows.
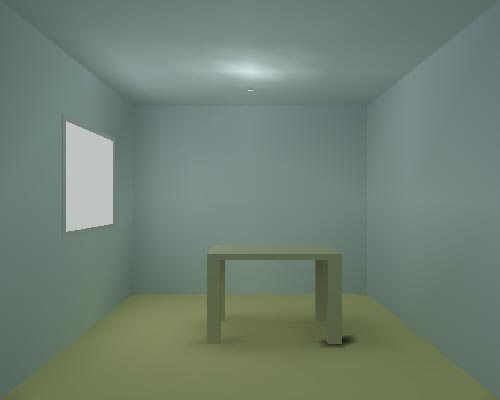
Here is our original, low resolution radiosity solution again, for comparison.
And here it is after ray tracing is applied. Compare these images carefully.
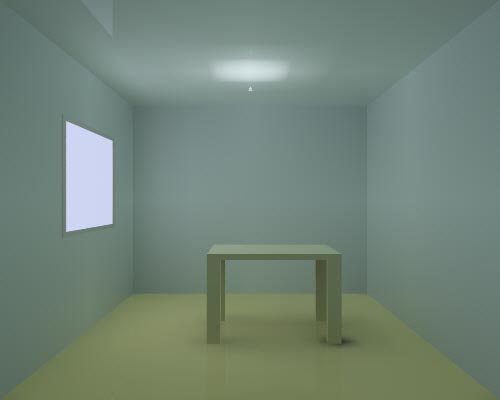
This a big improvement to be sure, but if you look back at the high resolution solution at the bottom of the last page, you'll notice that our ray-traced version is not quite as good. The ray tracer can only work with what the radiosity solution gives it, so the image above is lacking the nice directional shadows from the legs near the window.
But the ray tracer has added some other important touches. The table legs are now reflecting on the floor--a very convincing effect. And the table top now appear shiny as well, reflecting the window light. I had assigned shiny material definitions to the floor and ceiling, but these were not really evident until ray tracing was added to the solution.
The window glass is brighter in the ray-traced version because it's reflecting light from inside the room. The ceiling is different as well. The window is reflected on the ceiling. The painted surface has been made too shiny, but this fact was not evident until the ray tracing was applied. We'll correct this a bit later. The light cast on the ceiling by the bulb now appears artificially square. This is because, as just mentioned, the ray tracer can only work with what the radiosity solution gives it. Finer meshing on the ceiling will solve this problem, as we'll see later.So the best result, as far as the floor is concerned, is produced when we use ray tracing over the high resolution radiosity solution. Like so.

The shadows from the table legs are now very convincing, and there is reflection on the floor. Notice also how ray tracing adds a sharper (although very subtle) shadow from the table top due to the overhead bulb. Tiny touches like these really sell an image.
Now let's add wood textures to warm up the scene.| To Continue to Part 3, or Return to Part 1, Use Arrow Buttons |
|
Created: August 18, 1998
Revised: August 18, 1998
URL: https://webreference.com/3d/lesson47/part2.html
 Find a programming school near you