3D Animation Workshop: Lesson 47: More Radiosity Magic
|
|
Lesson 47 - More Radiosity Magic - Part 1
My mailbag tells me that many of you are as excited about radiosity and Lightscape as I am, so let's dig a little deeper into this complex subject. If you haven't read the previous lesson, you may want to take a look before continuing here.
Radiosity is great for what it's intended for. The effect of diffuse reflection between colored surfaces (such as walls, floors and ceilings) creates a atmosphere of remarkable realism. Gentle color gradients are what radiosity does best. But sharp changes in color can be a problem, especially with shadows. Radiosity is also completely incapable of rendering reflections on shiny surfaces. Thus, to create outstanding results, Lightscape can add ray tracing on top of the radiosity solution.
We'll start with the shadow issue first.
The following image (continued from the scene used in the previous lesson) allows the table legs to cast shadows on the floor, using both window light and light from the bulb overhead. These kinds of shadows are critical to perceived realism because without them the viewer is not convinced that the legs are in contact with the floor.
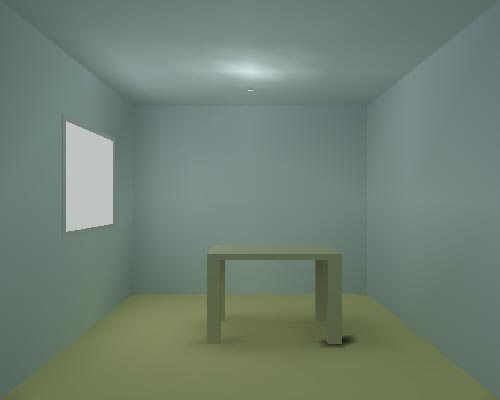
But these shadows are very unsatisfactory. They are extremely vague and do not convey the sense that the daylight is entering from one direction. Even more troubling is the much blacker shadow in the front right corner. There are two fundamental approaches to improving this situation.
The first approach is to refine the radiosity solution itself. The images in the previous lesson gave a sense of the rather loose meshing on the floor. If we select the polygon on the floor and assign it much finer meshing parameters, there will now be a great many vertices--enough to hold the shadows to a much higher degree of fidelity. Here's a close-up of the finer mesh near the base of the leg.
This results in a mesh composed of an astounding 70,000 polygons, almost all of which are in the floor. We'll discuss the consequences of such large files, and how to deal with them, in a future column, but for right now we should at least be aware that there is a downside to increased fidelity.
However, as you can see, the resulting image looks much better.
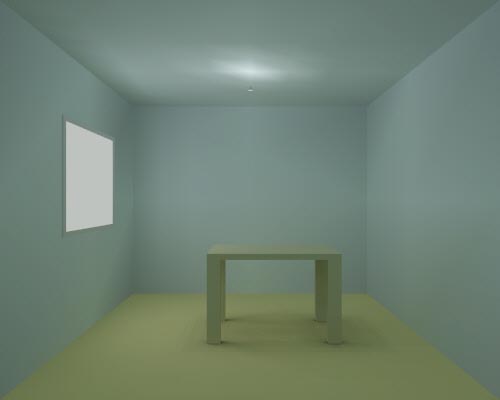
The black spot is gone, and the table seems grounded on the floor. Notice how well the daylight is handled. The legs closer to the window cast darker and more distinctly directional shadows than do the legs on the other side.
But there's another way to deal with the problem.
| To Continue to Parts 2 and 3, Use Arrow Buttons |
|
Created: August 18, 1998
Revised: August 18, 1998
URL: https://webreference.com/3d/lesson47/
 Find a programming school near you