3D Animation Workshop: Lesson 35: Softimage--Starting With Splines | 2
|
|
Lesson 35 - Softimage--Starting With Splines - Part 3
Softimage gives the user considerable control over how spline objects and surfaces will tessellate into polygons, and this is very important. The geometric weight of objects--the density of their polygonal meshes--is a major determinant of rendering time. In real-time rendering environments like games or VRML, very low polygon counts are necessary because the scene must render in a small fraction of a second to maintain the illusion of animation. But even in prerendered animation (and even with large still images), rendering time is an important consideration. Good modeling means providing just enough mesh density necessary for the desired quality of the output image, and no more. Beginning modelers will often produce models that have five or ten times the number of polygons necessary to produce a satisfactory render, and each render therefore takes far longer than necessary. At 30 rendered frames per every second of finished video animation, the render time of the individual frame is a very important issue indeed, especially for those who lack powerful hardware.
The "step" value setting for curves in the Softimage info dialog box for a selected object determines the tessellation of the object. If the value is set very low, for example to 2, the "curve" is broken into two line segments.
If the step value is moved up to 8, each segment is divided into eight segments, which is enough in this instance to create the complete illusion of a smooth curve.
Of course, this smoothness comes at a price. At a step level of 2, the sphere tessellates into 384 triangles for rendering. At a step level of 8, the geometry jumps to 6144 triangles.
To make the idea of the relationship between splines and the ultimate mesh absolutely clear, let's set the step value to 1.
You can see that the curvature has completely disappeared and we are essentially back to the crude polygonal sphere that we started this entire lesson with. You may wish to compare the following render with the render back in Part 1.
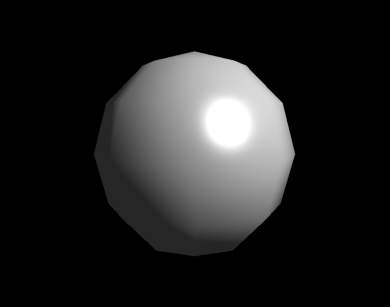
Thus, although there may seem to be a large difference between spline modeling and polygonal modeling (as indeed there is), both methods can end up reducing to much the same thing. In the next lesson we'll build on what we've just learned to understand the basic concepts of modeling with NURBS.
| To Return to Parts 1 and 2, Use Arrow Buttons |
|
Created: March 3, 1998
Revised: March 3, 1998
URL: https://webreference.com/3d/lesson35/part3.html
 Find a programming school near you