3D Animation Workshop: Lesson 20: Metal and Mirrors
|
|
Lesson 20 - Metal and Mirrors - Part 1
Before we get back to our photorealistic still-life let me share a valuable experience.
I work on a medium-priced Windows NT system with a single Pentium Pro 200 microprocessor and 128 MB of RAM. My video hardware is an OpenGL card (manufactured by Leadtek) featuring Glint 500TX and Glint Delta processors. These Glint chips are the well-known products of 3DLabs and, though breakthrough technology when first introduced, are certainly nothing outstanding today.
I recently had the opportunity to experiment with a number of new 3D graphics cards on my system, some of them running close to $4,000. The performance improvement with the most expensive ones was startling--but when the cards went home and my old Glint board was back in its slot, I felt a little small. I decided that I might at least download the latest Glint driver to see if it would make any difference. After all, it was free.
The improvement was simply unbelievable. It was as though I had just traded my existing card for hardware costing $2,000 more. There's a lesson here. 3D graphics hardware is only part of the story. Its performance is remarkably dependent on software, both the drivers and the 3D application software. For example, Lightwave's Open GL implementation is greatly improved in the recent version 5.5. When you're buying a 3D system, the graphics hardware will always be the most difficult part of the equation. Make sure you test the applications you intend to use, with the most recent drivers, before making such an important decision.
Let's go on with our project. Once again, here is the final render for reference.

Creating convincing realism in 3D computer graphics is, as we've emphasized perhaps ad nauseum, a matter of discovering happy tricks. This is just as true of realistic painting, and in no way demeans the medium. Often times the artist will simply luck into such a trick. Take a close-up of the spoon.
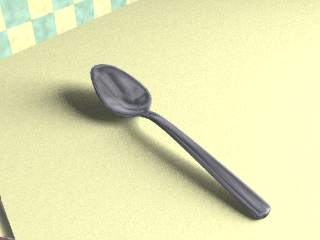
In this render, the spoon appears to have a kind of elegant beveling on the handle, with an apparent ridgeline running around the edge. But if we simply change the surfacing to something more like a dull, bluish plastic material, this feature disappears.

What was apparently a feature of the spoon's geometry turned out to be a element of the surfacing, and specifically in this case a result of a reflection image. This was a lucky break for me, because I intended to work in more detailed geometry and then discovered that I didn't have to. The concept is precisely the same as in BUMP MAPPING the lemon in the previous lesson. Seeming geometric detail is achieved through surfacing methods, sometimes unintentionally. We will always be discovering new and unexpected applications of this methodology.
Metal is an extremely important surface to master. I was looking for a softer look than true silver for this spoon, something a bit more toward pewter. A metallic surface is a delicate balancing act between the DIFFUSE COLOR, SPECULAR REFLECTION, and true reflectivity (meaning the reflection of color from surrounding surfaces as opposed reflection of the light sources). Spend some serious time looking at metallic surfaces, such as a spoon, and learn to analyze the metallic effect for yourself. As we've mentioned before, one surfacing parameter is typically most important in selling a look. In the case of metal, it's reflectivity.
| To Continue to Parts 2 and 3, Use Arrow Buttons |
|
Created: September 9, 1997
Revised: September 9, 1997
URL: https://webreference.com/3d/lesson20/
 Find a programming school near you