3D Animation Workshop: Lesson 15: XX | 3
|
|
Lesson 15 - Onward and Upward - Part 3
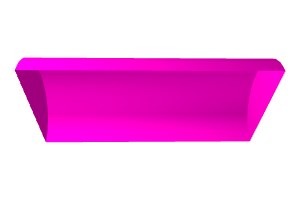
Boolean subtract will work to carve out the interior of the lid, just as we used it to carve out the interior of the box in the previous lesson.
Once again, a subtraction object is made from the original object because the shapes of the interior and the exterior are the same. We did not make precise measurements when creating the subtraction object in the last lesson because we wanted to move along quickly. But this can be very misleading. To make the final chest as I created it, exact measurements were critical because the walls of both the box and lid had to have the same thickness. Achieving uniformly thick walls in the box portion was relatively easy because of the square shape. But the rounded shape of the top will require more serious calculations, particularly because the top is not as high as it is wide.
Assume that the walls are to be 50 mm thick. Our lid is 1 meter long in x, 500 mm wide in z, and 200 mm high in y. This is like an old "word problem" from high school math. To create the right thickness, we need a subtraction object 900 mm long in x, 400 wide in z, and 150 high in y. Think this through, and especially note the difference between y and the other dimensions. In x and z, the subtraction object must make subtractions from both sides. Thus the subtraction object must be 100 mm smaller than the original in those dimension. The subtraction from y is only on one side (the top) and therefore the subtraction object has been reduced only 50 mm in y.
In some applications it may be easier to scale using these exact measurements. In others it will be easier to convert to percentages, as I did here. The subtraction object was created by scaling down 10 percent in x, 25 percent in y, and 20 in z. Work through these percentages yourself so that you understand how they properly scale the original lid into the subtraction object. These kinds of computations in multiple dimensions are part of the basic work of a modeler, and must come easily.

Will this work? Some of you may have noticed a problem.
For the Boolean subtraction to work, the subtraction object must break the bottom plane of the original object. Right now, the volume defined by the subtraction object is perfectly sized, but the bottom plane of the subtraction object coincides exactly with the bottom plane of the original object.
The most precise way of dealing with the problem is to move just the bottom plane of the subtraction object down a tiny bit, reshaping the object just that much. But it will be good enough here to simply translate the whole subtraction object down in y a tiny bit, just enough to break the plane, even though this means the walls will no longer be exactly 50 mm thick.
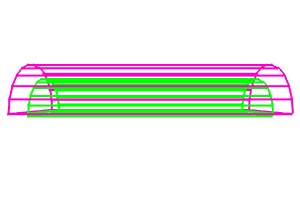
Boolean subtraction was the easiest way to deal with the problem of creating the lid, but it was not the only way. A completely different approach, involves building surfaces and assembling them. See if you can follow this train of thinking, which is greatly abridged.
We start once again with a primitive cylinder in the correct dimensions. But this time, instead of using Boolean subtract, we simply delete half the points and polygons. Now, instead of having a closed object with a flat rectangle on the bottom, we have an open shell.

Note that the fact that we can see the underside of this shell is due to the fact that we have deliberately created double-sided polygons for the surface. Generally, polygons are intended to be viewed only from one side, and creating double-sided surfaces will only needlessly increase rendering time.
The shell can be copied and scaled down in all three dimensions to create the interior surfaces of the lid. This will take some careful planning and probably a lot of experimentation, but in the end an interior shell of the proper dimensions can be positioned inside the original shell (now the exterior).
The final step is to create the bottom edges of the lid by creating joining the two shells together "by hand." The bottom corner points of the interior shell are connected to the bottom corner points of the exterior shell to create flat rectangular polygons. This creates a completely closed object.
| To Return to Parts 1 and 2, Use Arrow Buttons |
|
Created: July 28, 1997
Revised: July 28, 1997
URL: https://webreference.com/3d/lesson15/part3.html
 Find a programming school near you