3D Animation Workshop: Lesson 111: From Geometry to Pictures | 3
|
|
Lesson 111 - From Geometry to Pictures - Part 3
We need to know the precise 3D location that corresponds to each pixel on the render plane for at least one very important reason. What if two or more locations on object geometry in the scene project to the same pixel?
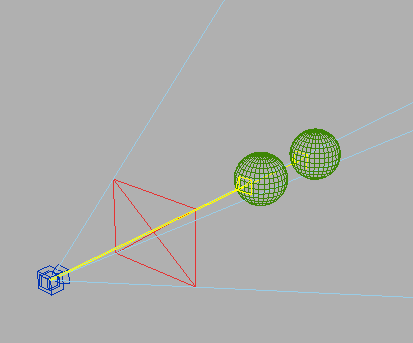
Where one or more surfaces overlap, we must make sure to render only the one that is closest to the camera. This is the problem of visible surface determination or hidden surface removal. The easiest solution is to maintain a z-buffer.
When a surface in the scene is rendered for a particular pixel, we obviously need to compute and store the RGB (red-green-blue) color value for that pixel. These values are stored in the frame buffer which constitutes the rendered image. But we can also store other information at that time. For example, we can store the z coordinate value in camera space associated with that pixel in a z-buffer. Remember that, by convention, the z direction in camera space is the direction in which the camera is pointing.
Whenever we encounter a surface location that projects to a pixel that has already been rendered, we can compare its z value to the z value already in the buffer for that pixel. If the new location is closer to the camera than the previous one, we replace both the z and color values with those of the new location. If the new location is farther away than the previous one, we can ignore it because it is inherently hidden by the surface already rendered.
We have yet to consider the illumination of surfaces. The color of a rendered surface at a given point is a function of the color of the material assigned to the surface and the lighting applied to that location. For example, a black surface is black regardless of how much light it receives, and a red surface will be black if it receives no light.
The amount of illumination that a point on a surface receives depends on alignment between the direction of the illumination and the direction that the surface is facing at that point. Take a look at the following image
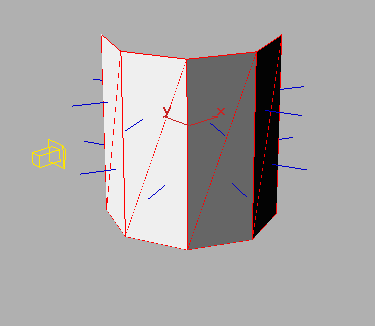
Each triangle, being perfectly flat (planar), necessary faces the direction perpendicular to its surface. These directions are indicated by the blue normals in the image. The triangles that more directly face the direction of the light  indicated by the arrow  receive the greatest illumination. The situation is precisely analogous to the change in daylight illumination as the sun follows its path through the sky.
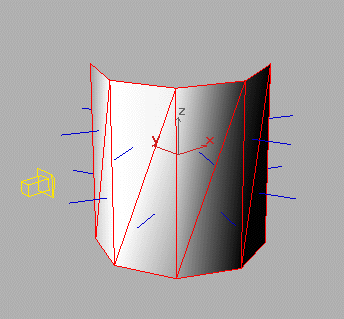
However, we very often need to create a smooth, rounded surface appearance, even though our models are necessarily created out of flat polygons. To achieve this, we perform a fundamental "trick." In the previous image, it's obvious the all points on the surface of a given triangle are facing in the same direction. But, by applying smooth shading, we override this and cause the normals to vary gradually across the surface of each triangle. This doesn't change the geometry, but causes the illumination to be computed as if every adjacent point faces a slightly different direction  just as on a truly rounded surface.
| To Return to Parts 1 and 2, Use Arrow Buttons |
|
Created: January 30, 2001
Revised: January 30, 2001
URL: https://webreference.com/3d/lesson111/3.html
 Find a programming school near you