ThinWire Handbook: Layout Management | Page 3
[previous] [next]
ThinWire Handbook: Layout Management
TableLayout
The other layout manager included with ThinWire is TableLayout. Whereas SplitLayout was created with a specific purpose in mind, and has a limited set of applications, TableLayout was created to be the ultimate, universal layout manager.
The concept of ThinWire's TableLayout was borrowed from an open source layout for swing called TableLayout. The concept is simple.
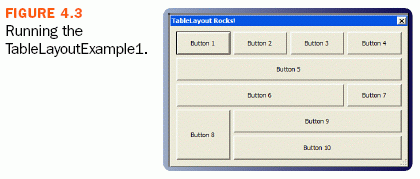
Think back to the early days of the Web. Do you remember your first masterpiece, the first (and last) time you claimed the title WebMaster? And what a master you were! Scrolling, blinking text, background music, Comic Sans font, and a hidden HTML table to lay out the site. Well, those days are long gone (thank goodness); but, although we all acknowledge the superiority of CSS for Web site layout, there is still something to be said about the simplicity of the HTML table layout. You could just basically draw the structure of the page as a table and place the content where it belonged. With TableLayout, this paradigm makes a triumphant return to Web design! See Listing 4.3 and Figure 4.3 for an example.
LISTING 4.3 TableLayout

TableLayout Does NOT Use HTML Tables
Before you get all worked up about using HTML tables for screen layout, let me reassure you that behind the scenes we're utilizing CSS for Component placement. Like any other layout manager, TableLayout is merely an abstraction of the actual screen layout.
TableLayout takes (up to) three parameters in its constructor. The last two you should recognize from SplitLayout. The margin and spacing parameters have the exact same meaning for TableLayout as they do for SplitLayout. The first parameter is a two-dimensional double array that defines the structure of the table. The first array is the table's column widths; the second array is the table's row heights.
Column widths and row heights can be specified in three different ways:
- Fixed pixel size (whole numbers > 1)
- Percentages (decimal numbers > 0 &&
- Fill (0)
In the preceding example, we create a table with four columns of equal widths and five rows of equal heights. Because we specified a size of zero (0) for each row and column, they will expand equally to fill all available space in the Container. If you were to drag and resize the Dialog, the dimensions of the Buttons in the table would change.
SplitLayout is simple in that it only ever works with two Components, and there are only two ways to arrange (left-right or top-bottom). TableLayout is designed to handle much more, and so it needs to know some extra information about the Components in the Container. Specifically, it needs to know in which cell(s) the Components belong. If this were Swing, this information would be provided by a constraint on the Component. Because this is ThinWire and not Swing, however, we have something a little more sensible different.
Limits
A limit is fundamentally the same as a Swing constraint. It's called a limit in ThinWire because limit is easier to spell, and we're all about simplicity. Because we take advantage of the List interface to manage the children of a Container, we prefer not to offer an overloaded add method to specify the limit. Instead, we have a setLimit method on Component that returns the Component.
Any layout can utilize limits. A limit, as defined by the Component interface, is just an object, so it can be anything you need it to. For TableLayout, the limit defines the top-left column and row, and the size (in columns and rows). For example, a Component that was in row 0 and column 0 would have its limit defined as "0, 0, 1, 1". This simply means that the Component starts in cell 0, 0 and is 1 column wide and 1 row tall. We realize that the default case is for a Component to occupy only one cell, so the same limit can simply be defined as "0, 0".
Limits Are Defined by the Layout Manager
As defined by the Component interface, a limit is simply an object. It is left up to the layout manager to define the limit. In the case of TableLayout, we assign the limits as a String. TableLayout implements a protected method called getFormatlLimit that converts the String assigned to a TableLayout.Range, which (like GridBox.Range) defines Row and Column information (and justification and size in a formal structure).
Relative Limits
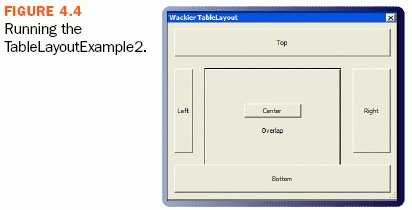
When you're prototyping a form, even managing the cell positions of Components can become cumbersome, especially if you are constantly rearranging Components on the screen. If this is the case, TableLayout enables you to specify the limit as an offset to the previously added Component (see Figure 4.4). For example, setLimit("+1, +1") positions that Component one Column to the right of the prior Component, and one Row below the prior Component. If you define your Components with relative limits, rearranging their position on the screen is as easy as rearranging the order in which they are added to the Container (see Listing 4.4).
LISTING 4.4 A Slightly More Wacky Use of TableLayout

If a Component has a fixed size, a justification may be specified in the limit rather than column and row sizes. In the preceding example, the Center button has a width of 100 and a height of 25, and is centered in cell 3, 3. Its limit is defined as "3, 3, c, c". The first c centers the Component horizontally, and the second c centers it vertically. Components may also be left (l), right (r), top (t), or bottom (b) justified within a single cell.
We believe that this model allows the flexibility to lay out Components in any fashion while still remaining very simple. But wait, there's more.
[previous] [next]
URL:


 Find a programming school near you