Reducing Noise, Correcting Chromatic Aberrations & Controlling Vignetting | 5
[previous][next]
Reducing Noise, Correcting Chromatic Aberrations & Controlling Vignetting
Reducing Chromatic Aberrations with Photoshop's Lens Correction Filter
|
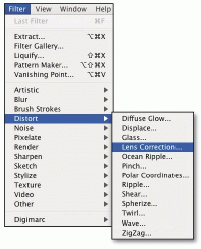
Photoshop's new Lens Correction filter offers an alternative environment to fix chromatic aberrations. To access the filter, select Filter > Distort > Lens Correction from the menu bar (Figure 7-32). There is no difference between the Chromatic Aberration controls in Lens Correction filter and Camera Raw's controls. None at all. They use the same underlying code to do the job. They both work on 16-bit files. The Lens Correction filter, however, allows you to magnify your image to a larger percentage--1600 percent, compared to the 400 percent Camera Raw offers. It also does much more than just fix chromatic aberrations. |
 Figure 7-32 |
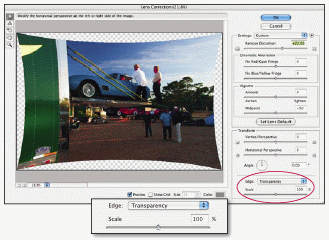
| The Remove Distortion slider, for example, is a nifty way to correct barreling and pin-cushioning effects produced by some lenses. As you'll see later in the chapter, you can use the filter to remove (or add) vignetting--just as you can in Camera Raw. The Transform commands open a lot creative options--all beyond the scope of this book. I really love how you can use the Edge setting to add black (or transparent) borders. The Lens Correction filter is a really a nice addition to Photoshop's native filter set (Figure 7-33). |
 Figure 7-33 |
To use the Chromatic Aberrations controls in the Lens Filter, simply refer to the previous section, "Reducing Chromatic Aberrations with Camera Raw". I suggest you deselect Show Grid, to get a clear view of your image. (The grid is handy when you use the Transform commands.)
| I do, however, want to use the Lens Correction filter to illustrate better how the chromatic aberration controls work. I may be beating a dead horse, but sometimes it helps to understand how something works--and I've found so many people just don't get this one. Anyway, look at this image (Figure 7-34). |
 Figure 7-34 |
I used the Distortion controls to "correct" for--in this case, non-existent--lens barreling. You can see how the image distorts inward. (Moving the Remove Distortion slider to the left corrects for pin-cushioning and distorts the image outward.) Well, imagine this same distortion specific to a select color instead of a global distortion. This is what happens when you use the chromatic aberration controls. The selected colors shrink or expand, incrementally, but enough to bring the colors back in line.
| By the way, just so you don't think you are going crazy. If you use the Edge: Background Color (found at the bottom of the Lens Correction filter), you'll always get a black border, regardless of which color you select in the Background swatch. I assume this will be fixed in subsequent versions of the filter (Figure 7-35). |
 Figure 7-35 |
Saving Lens Correction Settings
To save custom Lens Correction settings specific to Chromatic Aberration:
| 1. Select Save Settings from the pop-up menu (Figure 7-36). |
 Figure 7-36 |
| 2. Type in a descriptive name for your setting (Figure 7-37). |
 Figure 7-37 |
| 3. Load and apply your saved setting by selecting from the Settings pop-up menu. If it doesn't appear in the menu, select Load Settings from the pop-up menu next to the triangle and navigate to the appropriate location (Figure 7-38). |
 Figure 7-38 |
Diminishing or Adding Vignetting
Vignetting (darkening at the corners of the frame) can be caused by a mismatched filter/lens hood or a lens (e.g., using a filter on an ultra wide angle lens). It can also be caused by using wide angle lenses not optimized for digital capture (i.e., not optimized for even brightness across the frame). It's one of the easiest things you can fix in Camera Raw. Conversely, you can also add a vignette to your image, which will draw attention a specific part of an image.
To add or diminish a vignette:
1. Select the Lens tab.
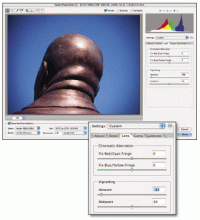
| 2. Adjust the Amount slider left or right. The edges will darken or lighten from a central radial point (Figure 7-39). |
 Figure 7-39 |
In this case, photographer Luis Delgado Qualtrough actually darkened the edges of his image to bring more attention to his subject. (The image, by the way, is part of quad-tych titled Dream, commissioned by a bookstore.)
3. Use the Midpoint slider to expand or decrease the range of the effect. You cannot, however, create multiple interest points. Adding a vignetting effect is therefore most effective when your image contains a single point of interest that you want to emphasize.
You can also use the Lens Correction filter found in Photoshop to create or diminish vignettes. The controls are the same as the ones in Camera Raw.
[previous][next]
URL:


 Find a programming school near you