Photoshop and PSP Channels pg 4: Production Graphics with Wendy Peck at webreference.com
 |
Photoshop and PSP Channels: Paint Shop Pro Channels Basics | |
 |
If you have been following along through the Photoshop pages of this tutorial, and work with Paint Shop Pro, I have good news and I have bad news. The good news is ... you can do anything with Channels in Paint Shop Pro that you can do in Photoshop. The one bit of bad news is that you will not have a preview as you work along on a channel. However, that should not stop you from enjoying the effects and corrections you can do through working with channels. |
|
|
Original image (top left) and the three color channels in separate documents. The image at the top is a larger version of the original shown in the set with the channels. |
Splitting Channels When channels are split from the image, PSP creates three new images, leaving your original intact. The images at the left are the result of splitting channels on the image shown at the top of this page. The original image file name is loon, and you should be able to make out the channel document names as Red1, Green1 and Blue1. These are all separate documents. |
|
|
Channel selection when combining individual channels into an RGB image.
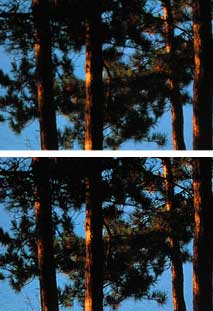
The top sample is a section of an image that was very good quality - too sharp to sharpen. I wanted more definition in the tree though, so I split the channels and sharpened only the green channel. Photos © Tom Thomson Photography. |
Merge Channels To merge channels, select Colors > Combine Channels > Combine from RGB. The Combine RGB window will open. Choose the grayscale image that you would like to use for the color channels in the combined image that PSP will create. If you have named the channel documents, the name will appear in the list with the name you assigned. If, as I have done, you are using the PSP generated document name, it will appear as the color name of the channel and a number. If you split the channels to work on an enhancement, as I have done with the images at the left, make sure that the Sync Blue and Green to Red if possible option is checked. PSP will create the image using the original channels, which is what we want. (A little later, we will look at decorative effects when we will turn this option off.) Click OK and PSP will create a new document combining the channels. If you are not happy with the results in the combined image, simply delete the new image. Activate the channel document(s) where you made changes, and apply new adjustments. Combine the channels to test the results. It is a quick process once you get used to it. The images at the left show a very subtle enhancement created by splitting channels. The top image is the original, and I wanted to pull a little more detail from the needles in the tree. The entire image was very sharp, though, so I could not sharpen the trees without ruining the image. As a solution, I split the channels and sharpened only the green channel. I can only show you a small sample here, but you can see a difference. In the entire image, the difference was quite dramatic. It is in subtle enhancements like this that the working with individual channels is so valuable. Now that you know how to split and merge the channels in an image, let's move on to have a little fun with it. |
|
Photoshop and PSP Channels Tutorial IndexPhotoshop and PSP Channels: What, When and Why? |
URL: https://www.webreference.com/graphics/column41/
Created: January 21, 2001
Revised: January 21, 2001


 Find a programming school near you