Jazzy Vector Effects pg 4: Production Graphics with Wendy Peck at webreference.com
 |
Jazzy Vector Effects: A Style of Your Own | |
| Any exciting technique leads a designer to say, "Cool! How do I make my own?" There is no fact more certain. In fact, considering the focus on professional designing that this column has, I would not have offered this tutorial had there not been a custom element to this feature. Custom element may be an understatement. You can not only adjust styles, but whatever your mind can imagine can be set as a style, a very valuable feature for the repetitive world of Web design. Let's start with adjusting and move on to creation from scratch. | ||
|
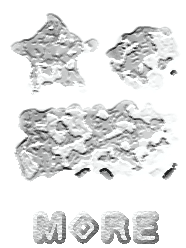
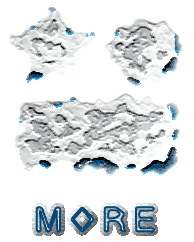
Combined styles resulting in a unique texture. The text shown here has the one of the original styles applied since the texture in the combined style is too heavy for text. |
Combining styles To combine styles, select the styles you would like to combine in the Styles palette. Click on the icon for the side menu and select Merge Styles. A new style will be created and placed at the end of the styles list. If you would like to assign a name to this style, double click on the style and type the name in the pop-up window. The new style is instantly ready to be used in the same way as the default styles, including combining with others. |
|
|
|
Editing a style To create a style, select the object containing the attributes you wish to save as a style. Click on the icon for the Style palette side menu and select New Style. Type a name for your style when asked, or accept the default name. Once again you have a new style ready to use on other objects.
|
|
 |
You can do the same without starting with a style at all. Create an object, add fills, brushes, transparency. Perfect the look, and then create a style. Click on the icon for the Style palette side menu and select New Style. Type a name for your style when asked, or accept the default name. In the sample at the left, I created a rectangle with a brush stroke, and a solid fill. I set the object transparency to 65%. I then created a style from the rectangle, as described above. It was a one-step process to add that style to a circle and star. Note how they all have the same transparency as well as fill and stroke. There is no limit to the styles that you can create. For repetitive elements, it is well worth creating a style even if you have a solid fill and an outline. Remember, you not only save time, but you also increase consistency when you use automated features. The phone may ring 25 times before you finish your design, which wipes all memory of settings from your mind. But Illustrator does not forget when you have saved a style. For that reason alone, styles are worthwhile, but there is more. Wouldn't it be nice to change your mind, even when you have created 75 objects with your fill. You can change your mind and all 75 items in a flash if you have used styles. Read on. |
|
Jazzy Vector Effects Tutorial IndexJazzy Vector Effects: Vectors Can Be Fun
|
URL: https://www.webreference.com/graphics/column39/
Created: November 24, 2000
Revised: November 24, 2000
 Find a programming school near you