Vector Gradient Fills 2 pg 5: Production Graphics with Wendy Peck at webreference.com
 |
Vector Gradient Fills 2: Flash Gradient Fills | |||||
|
|
Flash is the last program we will cover for this round of gradient fills. If you are new to Flash, and wisely decide to devote time to checking out other Flash examples on the Web, you will quickly notice that the sites that really catch your attention often make very good use of gradient fills. Most also capitalize on the easy transparency capabilities that are build into the gradient fill options. A note of caution though gradient fills do affect file size. If you are working hard to keep your file size minimal, only use gradients when they will have the most impact. You can really bloat a file with many small areas of gradient fill. Not that you should abandon them I don't mean that at all, because gradients can bring a screen to life. Just use gradients with the knowledge that there will be a cost, so they should definitely be advancing the design. |
|||||
|
Color button leads to custom colors and gradient fills
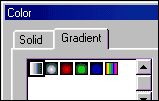
Custom and default gradient fills can be selected from the Fill Color window.
Click on the New button to create a new gradient fill. Choose Radial or Linear.
Color is controlled with color pointers as shown on top of the Gradient Definition Bar. The key at the far left is the Pointer Well.
|
To create a gradient fill, click on the Color window button at the top of the Fill Color window, shown highlighted in yellow in the illustration at the left. This opens the Color window, where we will build our gradient fills.
To create a new fill, click on the New button. The currently selected Gradient fill will be duplicated and a new icon created for your new custom gradient. Choose Linear or Radial from the drop down menu above the New button. All color is controlled by pointers above the Color Definition bar. The selected pointer is depressed, as shown at the left. The right pointer key is down, while the left pointer and the color well are up. Any change you make to color will apply to the selected pointer. The Pointer Well, the pointer to the far left, can be used to store a color which you will need often. Like the other pointers, it must be depressed to receive color. This well does not affect the gradient fill. To use, simply drag the Pointer over any other pointer and release. The color will be transferred to the active pointer. To add a color point, simply click in the Color Definition Bar at the point you would like to add color. The new pointer will be assigned color that appears at that location. To delete a pointer, click and drag it up or down until it disappears. (You can also drag it to the side, but it is easy to drop it just at the edge and have it affect the end color in the gradient.) Preview your gradient fill in the Preview window, shown in the upper left corner of the illustration at the left. |
|||||
|
|
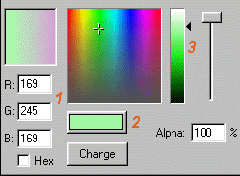
Color can be chosen in any of three ways. 1. Specify RGB numbers (or hex values if you prefer activate the Hex option just below the RGB numbers). 2. Click on the Solid Colors pop-up menu and choose a color. 3. Choose a color from the Hue bar at the right of the screen. You can load new colors into the Hue bar by clicking in the desired area in the Color window, just to the left of the Hue bar. |
|||||
|
|
Create transparency And transparency could not be easier. Activate the pointer you wish to affect and drag the Alpha slider, at the far right of the Color window, to the desired value, which is shown below the slider. 100% is solid color, and 0 is completely see through. When you are happy with your gradient, click on the Change button in the Color window. Your icon changes to represent the new gradient, and the new fill will appear in the Fill Color window, ready for use with the Paint Bucket tool. If you wish to delete a gradient from the Color window, simply select the gradient icon and click on the Delete key. |
|||||
| And that's all there is to the mechanics of Flash gradient fills. Of course, that is just the very beginning. Whenever you have this much potential for variation, a long road of experimentation will follow. Try to stretch your gradient knowledge, though. Work in some transparency to your fills. Before long, you will be naturally reaching for this simple tool that can add so much to your images ... especially when they are moving. | ||||||
|
|
Vector Gradient Fills 2 Tutorial IndexVector Gradient Fills 2 Start |
URL: https://www.webreference.com/graphics/
Created: July 5, 2000
Revised: July 5, 2000


 Find a programming school near you