Vector Gradient Fills 2 pg 2: Production Graphics with Wendy Peck at webreference.com
 |
Vector Gradient Fills 2: CorelDraw Fountain Fills | |||
|
The Fill tool presents the flyout containing the Fountain Fill tool.
Four different types of fountain fills offered in CorelDraw.
|
Gradient fills in CorelDraw are labeled as fountain fills, and I will use that terminology for this section, even though the article title refers to gradient fill. Fountain fills in CorelDraw are completely controlled through the Fill tool. Click on the Fill tool, and the Fill flyout will open. The Fountain Fill tool is the second in the flyout, shown highlighted by red at the left. Clicking on the Fountain Fill tool opens the Fountain Fill dialog box, which contains all the tools you require to create your fill. Choose fill type Hint: With CorelDraw fountain fills, you cannot see what is happening with your object.(Anyone listening? We need a preview function.) You will find that you are back and forth between the Fountain Fill window and the document countless times. It is worthwhile to click and drag the Fill Flyout to separate it from the Toolbox, or to commit F11 to memory as the shortcut to open the Fountain Fill window. Select the object you wish to fill, and open the Fountain Fill window. Choose the fill type you require from the drop down menu as shown at the left. If you choose Radial, Conical or Square, you will be presented with the option to change the Center Point, but that is easier to do with your mouse later. |
|||
|
|
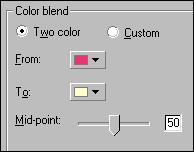
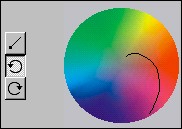
Choose your color The midpoint slider adjusts where the colors blend. Moving the slider to the left shifts the color blend position to the left, or closer to the outside, depending on the fill style. For a two color blend, you also have the choice of how your colors are blended. The first setting creates your blend directly from your first to your second color. The counterclockwise selection chooses the blend in an arc from your first to second color. The third choice creates the blend in a clockwise direction, and introduces many new colors to your blend. Experiment a little with this area to get used to what you can expect. The color produced by each choice changes dramatically depending on the start and end colors. I could probably find the mathematical explanation for all of this in my design texts, but quite frankly, we usually don't care. Click a few times and you will know which color direction you desire. I'll pass the baton on this one to the design theory teachers. |
|||
|
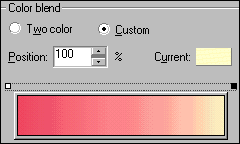
Custom color screen. Note that the color selector at the far right is black, indicating that that is the current color.
Two colors have been added to the original fill in this view. Note how the color selector above the peach color is black, indicating that it is the current color. |
For a fill with more than two colors, activate the Custom color option. A color palette and option to access the full range of CorelDraw colors is presented, and a color slider bar to preview your blend. This window provides only color information. Refer to the main preview in the upper right hand corner to preview your blend. On activating the Custom fill, the existing, or default two color fill will be displayed. Along the upper edge of the color bar, note the white square at the left and the black square at the right. These are your control points, and the black one at the right is selected. Look just above, and you will see the yellow showing as the current color. Click on the left selector, and the current color changes to red. To add a color, double click along the slider bar along the top of the color bar, where you would like to add a color. A triangular marker appears, filled with black, since it is selected, and the current color will change to whatever color is at the location of the new marker. To choose your color, simply select a new color from the palette or Other button to the right. Click and drag on any selection point to move the position of the color. In the second custom color shot shown at the left, note how two color selectors have been added. The peach color is active, as shown by the black triangle and the current color showing. You can add as many colors as you wish in this way. If you find the transition from one color to another is too slow or fast, add color points to precisely control the color blending. The start and end colors can be moved as well, if you wish the color to start or end before the edge of the object. |
|||
|
|
||||
|
Clicking and dragging in the preview window moves the center point or adjusts the angle, depending on the type of fill.
You can set the angle numerically for linear fills, and must use this option for the other fill types. |
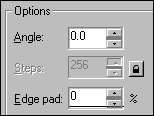
Set fill angle, center point and edge pad The Edge Pad option provides control for where the blend will start. If you are blending into a background, this setting, usually set to 5% or 10% will ensure that the fade occurs before the non-background color reaches the edge of the object. You can also accomplish this with a custom color by moving the first color to the right providing a buffer area filled with the start color.
|
|||
|
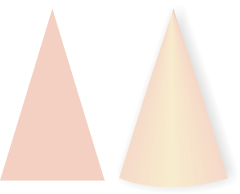
Why are fountain fills so popular? The samples shown here are the same basic object. The second triangle has had a fountain fill, slight node adjustment of the bottom curve and a drop shadow added. Very little work to bring a simple shape to life. Get good at these fills ... your career needs them. |
Finally, to save a fountain fill for future use, or to access several preset fills, you will use the Presets area at the bottom of the Fountain Fill window. To use a preset value, simply click on your choice from the list. You can also edit the presets, so while it is unusual to find just the right fill, you may be able to come close and save some time. If you wish to save your own fill, or a variation of one of the preset values, first prepare your fill until you are satisfied. Make sure that the Preset value window is empty and type in a name for your fill. Click on the + button to save. The fill is saved in the CorelDraw defaults and will remain until you remove it. You can also save a fill that you created earlier, as long as you still have the document containing the fill in CDR format. Select the object with the fill you wish to save and open the Fountain Fill window. The fill will be featured. Follow the steps above to save. To remove a fill from the list, highlight it and select the - button. That's all there is to a CorelDraw gradient fill. But if you would like more control of the color blending, keep going to the next step blends. |
|||
Vector Gradient Fills 2 Tutorial IndexVector Gradient Fills 2 Start |
URL: https://www.webreference.com/graphics/
Created: July 5, 2000
Revised: July 5, 2000







 Find a programming school near you