DHTML Lab: Hierarchical Menus, I; The Item Stylesheet
 |
DHTML Hierarchical Menus, Part I
| ||
|
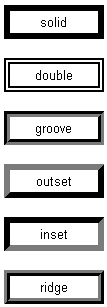
Pass your mouse over the links above to compare the displayed menus to the parameters discussed on this page. Border Styles:
Note: The CSS1 specification also includes the dotted and dashed border styles. Neither 4th generation browser, however, supports these. | In column 13, Dynamic Headline Fader, we discussed the dynamic creation of CSS stylesheets, based on parameters declared as JavaScript variables. This technique is especially necessary for Navigator, which has not yet exposed all object properties to post-load modification. If this is new to you, a quick look at that column will help you understand the routines on this page. To avoid making our present technique unnecessarily complex, we will create the look of our menus by defining the style of our individual items. You can expand on this by modifying the routines to include styles for the full menu as well. Styling the ItemsWe begin the script for our Hierarchical menus by declaring the style variables for each item. If we are going to use menus on many pages, with different looks on each, we can include the menu script we will build in an external file, available to all pages and declare the page-specific style variables in the HEAD of the page itself, as we did for the Headline Fader Assuming, therefore, that the menu script will be in an external file, we create a script in our HTML page for our variables: <SCRIPT LANGUAGE="JavaScript1.2">
<!--
menuWidth = 120; // pixel integer only
borWid = 2; // "
fntCol = "black"; // CSS standard notation
fntSiz = "12px"; // (strings)
fntWgh = "normal"; // "
fntSty = "normal"; // "
fntFam = "sans-serif"; // "
borCol = "#CC0000"; // "
borSty = "outset"; // "
linHgt = "normal"; // "
First, the width of the item, which determines the width of the menu is assigned to menuWidth. Since menuWidth will be used in our routines, as well as our style definition, we simplify things by allowing only an integer representing the pixel width as a value. The same goes for borWid, which defines our item border width. Set it to 0, if no border is required. The fntSiz, fntWgh, fntSty and fntFam variables follow CSS convention and can be any value allowable for the font-size, font-weight, font-style and font-family properties. They, of course, determine the look of the text displayed in each item. To separate items in a menu, we use the CSS border property. In previous columns, like Low Bandwidth Rollovers and DHTML Jigsaw Puzzle, we used CSS "solid" borders. To achieve a 3D effect for our menus, we can give the border one of the other available values. An illustration of possible border styles is presented in the left column. Thus, borCol and borSty are given the values expected by the CSS border-color and border-style properties. Finally, we assign a value for line-height to linHgt. Experiment with this property to space the items vertically. Item Background ColorTwo variables, backCol and overCol, determine the default background color and the mouseover background color of the items. backCol = "#DDDDDD";
overCol = "#FFCCCC";
Since Navigator can set the background color of an element at any time, these variables will be used in our routine script later. Miscellaneous and Behaviour VariablesAlthough we would prefer to have a text-only, fast-loading, routine for our menus, a concession is made for the "triangle" image users expect to see when an item has a child menu. Microsoft's WebDings font, that contains symbols like these, is not widely used, so we have drafted the triangle image, imgSrc = "triangle.gif";" The size of our triangle image should conform to the size of the item font. Against our best instincts, we use the same image for all our menus and size it using the WIDTH and HEIGHT attributes. It's a hack, of course, but it does the job well. The triangle above is actually situated in a perfectly square box of 16x16 pixels with a transparent color. Without the transparency, it would look like this: imgSiz = 10; } Finally, we declare four variables that will help determine the behaviour of the menus. That is:
These four variables complete our in-page parameter declaration script: childOverlap = 50;
childOffset = 3;
perCentOver = null;
secondsVisible = .5;
//-->
</SCRIPT>
The example parameters above produce the look of the menus in the left column above. Compare the the final product to our parameters before moving on to create the script that actually creates the menus. |
Produced by Peter Belesis and
All Rights Reserved. Legal Notices.Created: Feb. 19, 1998
Revised: Feb. 19, 1998
URL: https://www.webreference.com/dhtml/column14/menuCSS.html


 Find a programming school near you