Page Structuring Using Cascading Style Sheets - Part 2/Page 3
[next] [next]
Page Structuring Using Cascading Style Sheets: Part 2
Inserting DIV Tags
Because we've already outlined the style rules using ID selectors in an external style sheet, we need only to insert three <div> tags into the page with IDs that match the ID selector names we created. To demonstrate this, let's insert a <div> for the Header portion of our page. You can do this by choosing Insert, Layout Objects, Div Tag. Alternatively, you could also click the Insert Div Tag icon (the first icon to the right of the Standard and Expanded buttons) in the Layout category of the Insert bar. Either method you choose produces the same result; the Insert Div Tag dialog launches and appears similar to Figure 7.14.
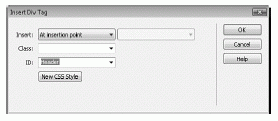
Figure 7.14 Use the Insert Div Tag dialog to create a new <div> tag in the page.
Although the dialog allows you to enter a class name and pick an insertion point for the tag, all we care about is entering the ID name that represents the ID selector we've defined within our style sheet. Because we're creating the header of the page, select the Header option from the ID drop-down menu (see Figure 7.14) and click OK. The AP Element is created, complete with the dimensions, placement properties, and the background image we defined.
By default, Dreamweaver adds the text Content for id "Header" Goes Here within the AP Element. Select this text and delete it so that we can add the header.gif image into the AP Element. When you've deleted the text, drag the header.gif image, located in the Images folder, into the AP Element. The result of the design resembles Figure 7.15.
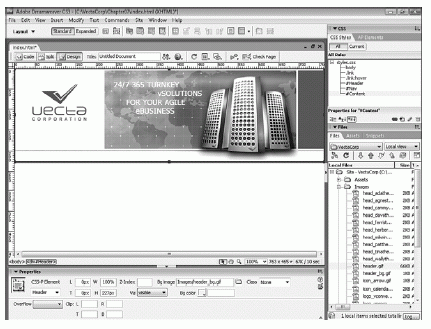
Figure 7.15 Add the header.gif image into the Header AP Element.
Now you're ready to create the second <div> tag that will define the navigation section. To do this, click the Insert Div Tag icon located in the Layout category of the Insert bar. When the Insert Div Tag dialog appears, select the Nav option from the ID drop-down menu and click OK. As you'll see, the Nav AP Element is added just below the Header AP Element.
Again, remove the Content for id "Nav" Goes Here text so that we can begin to define the navigational elements that will appear within this AP Element. When the placeholder text is deleted, add the first navigation element, Home, to the AP Element. Do this by following these steps:
|
Now you can add the rest of the navigation elements: About Us (aboutus.html), Solutions (solutions.html), Support (support.html), and Contact Us (contactus.html). When you finish adding the navigation items, the result appears similar to Figure 7.16.
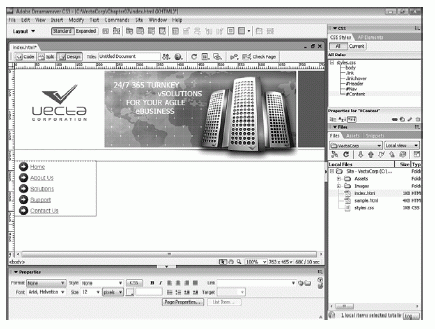
Figure 7.16 Add the rest of the navigational items to the Nav AP Element.
Finally, let's add the content section. Again, you can accomplish this task by clicking the Insert Div Tag icon in the Insert bar. When the Insert Div Tag dialog appears, choose the After Tag option from the Insert menu, choose the <div id="Nav"> option from the menu that becomes enabled (this is done purely as a means of forcing Dreamweaver to organize the code properly), and choose the Content option from the ID drop-down menu. Click OK. The new AP Element is added below the Header AP Element but just to the right of the Nav AP Element. With the AP Element firmly in place, you can add the content that will fill that area. For instance, you might want to add the subheader_welcome.gif image as the subheader within the AP Element. You might also decide to add the text contained in the home.txt file in the Assets folder. When you've finished, the result should closely resemble Figure 7.17.
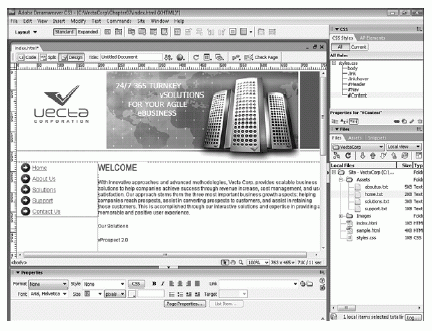
Figure 7.17 Add text and images to the new Content AP Element.
With your design complete, test the page in a browser by pressing F12 (Option+F12). As you'll see, the design renders without problems (refer back to Figure 7.1).
Of course, our design efforts don't have to stop here. We might want to create another AP Element with associated properties for our company events. Furthermore, we might want to add yet another AP Element with associated properties for the footer of the page. As you can begin to see, the design and implementation is simple.
Even better than the implementation is what has been added to the HTML. Switch to Code view and notice that the code is much cleaner and is minimized to roughly 30 lines of code (mostly text for the Content AP Element) in contrast to the 100 or so lines associated with the design when we were working with tables.
Converting AP Elements to Tables for Backward Compatibility
In the previous sections, we used AP Elements to create a standards-compliant, tableless web page. Although the design was simple to create, it doesn't do us or our users much good if they're using older browser versions such as Netscape 4. As you saw back in Figure 7.2, the page doesn't look very good in Netscape 4.
To solve this problem, we have to re-create the site using a backward-compatible model in tables. Before you become frustrated at the thought of having to rebuild the page using tables, know that there's an easy and automated way of accomplishing this task in the Convert AP Divs to Tables feature. Using this feature in conjunction with the Check Browser behavior, we can guarantee that our users will see the appropriately formatted page regardless of what browser version they are using. To run through this process, choose Modify, Convert, AP Divs to Table. The Convert AP Divs to Table dialog appears, similar to Figure 7.18.
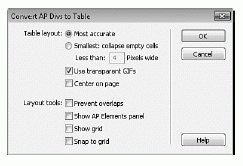
Figure 7.18 The Convert AP Divs to Table dialog facilitates the process of converting our CSS-based design to one that uses tables.
The following functionality is revealed in the Convert AP Divs to Table dialog:
|
The rest of the features in this dialog exist for the reverse process (that is, converting tables to AP Divs). In this scenario, these check boxes merely provide viewable options such as the AP Elements panel, the grid, snapping, and so on. When you finish making the necessary adjustments, click OK. Immediately, our AP Elements-based page is converted to a table with a few minor discrepancies. For instance, it seems as though we lost our background image for the header. This is largely because the background image is attached to the ID selector in the style sheet. Dreamweaver has no way of knowing which cell in our new table to apply the background image to. To add it back in, select the header row within the table and use the point-to-file icon in the Bg field to browse to the header_bg.gif image. You may also need to merge the two cells that were created within the header row into one cell. You can do this by selecting both cells and choosing Modify, Table, Merge Cells. Finally, you'll need to position the border between the navigation cell and the content cell so that the navigation and content cells are closer together. After you've made those modifications, save your work as index_netscape.html. Now try testing the page in an older version of Netscape.
Tip: If you don't have an older version of Netscape, you can download all archived versions at the following URL: https://browser.netscape.com/downloads/archive/.
As you can see from Figure 7.19, the page looks as it did in newer browser versions using AP Elements.
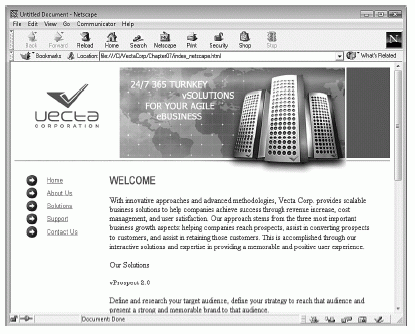
Figure 7.19 The page using tables looks as good in Netscape 4.7 as it did in newer browser versions using AP Elements.
Note: Although Dreamweaver does its best to convert your CSS-based design to tables, it's certainly not perfect. In many cases, additional tweaking of your design is mandatory to get the specific layout to look the way you want it to look in older browsers such as Netscape 4.
The last thing you'll want to do is add the Check Browser behavior to the index.html page. This behavior allows us to create functionality so that when the user visits the index.html page using a Netscape 4 browser, the user is automatically redirected to index_netscape.html. However, if users visit the index.html page using a newer browser, they stay right where they are, on the CSS-based index.html page. To add this behavior, follow these steps:
|
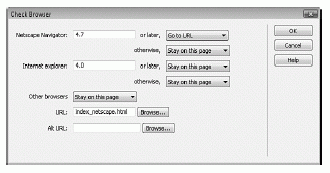
Figure 7.20 Configure the Check Browser behavior so that users visiting your site using Netscape 4 browsers are automatically redirected to the correct page.
With the CSS-based page still open, try to preview your page in Netscape 4. Notice that you are automatically redirected to the index_netscape.html page.
Note: Obviously, if this were a full site with numerous pages, you'd want to convert all of the pages and links within the site.
Built-In CSS Page Layouts
One of the hottest web-development techniques is the process of laying out web page structures using CSS instead of traditional HTML-based methods such as tables or frames. As the Web evolves, so too does the process of creating web pages. Therefore, tables are viewed as an archaic method of page structuring. As a web developer you should be aware of that fact and begin learning and integrating standards-compliant methods into your site designs. In the previous few sections we began to do just that. As you might recall, you looked at ways of building web pages that rely on CSS for the positioning and structuring of web pages. What little HTML we used was meant purely for integrating CSS rules or for adding imagery and media elements to your pages. As you might also recall, the learning curve for creating standards-compliant CSS page designs is relatively higher as compared to tables or frames. To help you along, Dreamweaver CS3 integrates a collection of carefully crafted and comment-rich CSS Page Layouts.
This section will get you up to speed with Dreamweaver's CSS page layouts. As you'll see, working with CSS-based structuring techniques has never been easier—thanks to this new collection of page layouts. To build a new web page based on prestructured CSS-based layout, start by selecting File, New. The New Document dialog appears. Select the HTML option from the Blank Page category. Up to this point in the book we've usually selected the <none> option from the Layout list and clicked Create. This time, however, take a closer look at the additional options within the list. As you can see from Figure 7.21, additional prebuilt CSS-structured options exist.
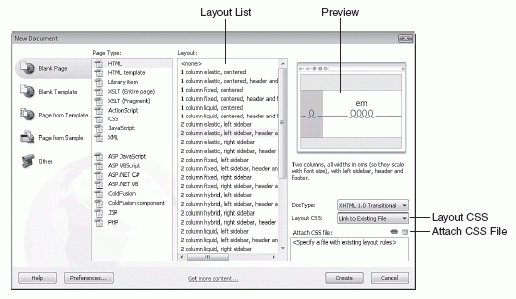
Figure 7.21 Choose from a list of prebuilt CSS-structured page layouts.
Numerous options exist within this dialog for creating and handling the CSS that results, including the following:
|
Now that we have a layout selected and we've instructed Dreamweaver as to where it should place the accompanying CSS, click Create. Immediately, a new Document window is created, complete with your selected layout, similar to Figure 7.22.
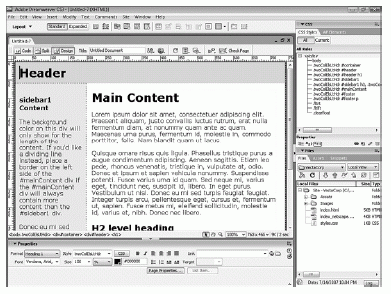
Figure 7.22 A new document window instance is created complete with your selected layout.
At a glance, you can see that the content is placed within DIV tags. And, like you saw in the previous section, the positioning and structure of those DIV tags are controlled using a series of carefully crafted classes, also visible in the CSS panel in Figure 7.22. Now try switching to Code view. Immediately you'll notice how many comments have been added to guide you through the relatively new process of using CSS to structure web pages. Now comes the fun part—removing the default text that appears in the DIV tags and replacing it with the Vecta Corp content. See if you can accomplish this task on your own!
Summary
As you've seen in this chapter, AP Elements offer a clean, standards-compliant alternative to developing websites. Using CSS in conjunction with <div> tags affords you the capability to cleanly separate positioning and formatting properties from structural code.
In this chapter, you learned about the various methods for inserting AP Elements, modifying properties outlined by AP Elements, and structuring pages using AP Elements and CSS positioning properties. Furthermore, you looked at some of the new Dreamweaver CS3 CSS-based page layouts and how building CSS-based designs is not only easy, but also effortless when you take advantage of them.
In the next few chapters, we'll begin to shy away from CSS and take a much different direction by beginning to discuss important concepts as they relate to team collaboration and task automation.

Printed with permission from Pearson Education from the book Adobe Dreamweaver CS3 Unleashed written by Zak Ruvalcaba.
[next] [next]
URL:


 Digg This
 Find a programming school near you