Page Structuring Using Cascading Style Sheets - Part 2
[next]
Page Structuring Using Cascading Style Sheets: Part 2
Modifying AP Element Properties with the AP Elements Panel
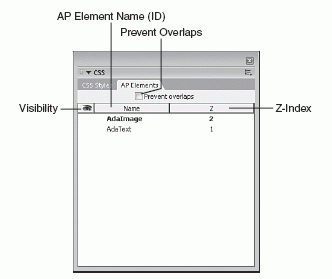
Another option for customizing AP Element properties is the AP Elements panel. You can use the AP Elements panel as a way to set an AP Element's ID, Visibility properties, Z-Index, and whether AP Elements can overlap one another. The AP Elements panel, shown in Figure 7.9, can be selected directly from the CSS Styles panel group or by choosing the AP Elements option from the Window menu or by pressing F2. Alternatively, you can right-click (Control+click) an AP Element's border to access the context menu and choose the AP Elements Panel option to open the AP Elements panel.

Figure 7.9 Use the AP Elements panel to visually set visibility, Z-Index, ID, and overlapping properties.
With the AP Elements panel open, notice that the style and overall appearance is strikingly familiar, looking much like the Layers panel does in an image-editing program such as Fireworks or Photoshop. For instance, you can drag AP Elements above or below other AP Elements, effectively changing the Z-Index of the AP Elements on the page.
Tip: If you drag an AP Element in the Document window that doesn't contain a Z-Index, Dreamweaver automatically adds one for you.
You can also click in the eyeball column to change the initial Visibility property for an AP Element. Finally, you can double-click in the Name column to change the ID of the selected AP Element. All this and more is possible through the AP Elements panel. The following customizable properties are revealed within the AP Elements panel:
|
It's important to understand the place of the AP Elements panel. Sure, most of these properties can be set by selecting the AP Element and making the necessary change in the Property inspector. The difference between the Property inspector and the AP Elements panel, however, is that the AP Elements panel allows you to work with AP Elements even when they're hidden from view. Because the Property inspector becomes available only when an AP Element is selected, there is no way of changing the Visibility of an AP Element back to Visible after it's been Hidden without the use of the AP Elements panel. Also, it's important to note that the AP Elements panel represents the collection of AP Elements on the page, in contrast to the single AP Element that is covered by the Property inspector. The Prevent Overlaps check box prevents all AP Elements on the page from overlapping each other (discussed in the next section).
Preventing AP Elements from Overlapping
As mentioned in the previous section, you can use the Prevent Overlaps check box in the AP Elements panel to prevent all AP Elements on your page from accidentally overlapping each other when you position them. To demonstrate this feature, follow these steps:
|
Nesting AP Elements
Similar to the process of nesting tables within a cell of another table, AP Element nesting is the process of placing an AP Element within another AP Element. By default, Dreamweaver doesn't automatically nest AP Elements; instead, Dreamweaver allows you to enable this option in the AP Elements category of the Preferences window. To enable AP Element nesting in your site, follow these steps:
|
With that preference set, you can now create AP Elements within other AP Elements. For the most part, the process of nesting an AP Element within a second AP Element is as simple as drawing or inserting an AP Element within another AP Element. To do this, follow these steps:
|

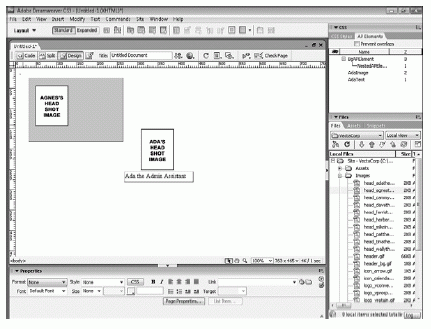
Figure 7.10 Nest an AP Element within an existing AP Element.
It won't be overly obvious that the new AP Element is nested within the BgAPElement AP Element. However, you can see that the AP Element is in fact nested by looking at the AP Elements panel, also shown in Figure 7.10. As you can see, the NestedAPElement AP Element appears as a child node beneath its parent BgAPElement AP Element. The real benefit to nesting AP Elements becomes evident when you're working with Visibility properties. Because the default Visibility property of an AP Element is Inherit, the child AP Element always inherits the properties of its parent AP Element. What this means is that all we have to modify is the parent BgAPElement AP Element. Visibility changes made to this AP Element propagate down to all child AP Elements, effectively saving us from doubling our efforts.
Although it would seem logical that dragging a nested AP Element out of its container AP Element would unnest an AP Element, that isn't how you unnest elements. To unnest an AP Element, you must use the AP Elements panel to drag a child AP Element out of its current position and reposition it higher in the list in the AP Elements panel.
Deleting an AP Element
If you decide that a particular AP Element is no longer needed, you can easily delete it using one of two methods. The easiest way to delete an AP Element is to select it on the page and press the Delete or Backspace key on your keyboard. This action effectively removes the AP Element and its content from the document. The second option for deleting an AP Element from the Document window is to right-click (Control+click) the <div> tag in the Tag Selector and choose the Remove Tag option from the context menu. This action removes the <div> tag but does not remove the content from the Document window. The same holds true if you right-click the actual <div> tag on the page and choose Remove Tag <div>.
[next]
URL:


 Digg This
 Find a programming school near you