Page Structuring Using Cascading Style Sheets / Page 3 | WebReference

Page Structuring Using Cascading Style Sheets / Page 3


[previous]

Page Structuring Using Cascading Style Sheets: Part 1

Inserting Content into AP Elements

Inserting content into an AP Element is just as easy as it is to insert content into the cell of a table. To demonstrate this, I'll insert text into the first AP Element (the one at the top-left of the page) and insert an image into the second AP Element (the one on the center of the page that we just drew). To insert text into the first AP Element, place your cursor into the AP Element and start typing the text Ada the Admin Assistant. Now let's insert Ada's headshot photograph into the second AP Element. To do this, drag the head_adatheadminassistant.gif image (located in the Images folder of our defined site in the Files panel) into the AP Element. When you've finished, the page will resemble Figure 7.4.

Notice that the text and the image are slightly undersized compared to the size of the AP Elements. To resize the AP Elements to correspond with their content, click, hold, and drag the resize handle located in the bottom-right of each AP Element to resize the AP Element to the size of the content within it. Finally, move the AP Element that contains the headshot photograph and place it just underneath the text AP Element. The result looks like Figure 7.5.
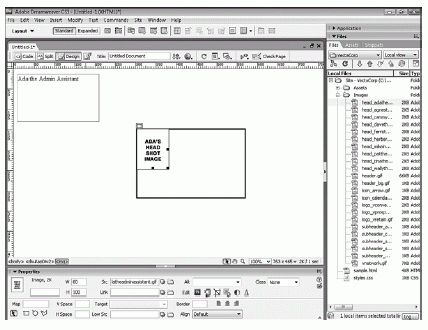
Figure 7.4 Add text to the first AP Element and drag an image into the second AP Element.
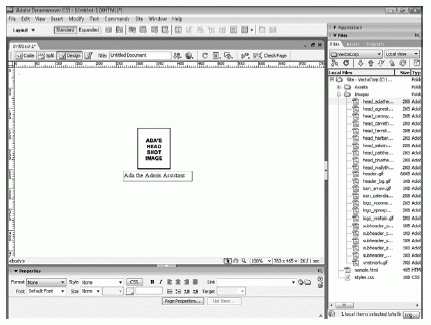

Figure 7.5 Resize the AP Elements so they match the size of the content within them and drag the headshot AP Element so that it sits just above the text AP Element.

You'll begin to notice the flexibility that AP Elements reveal: Adding them to the page is easy, moving them is easy, and resizing them respective to the content within them is easy. In the next few sections, we'll discuss the various properties you can set using the Property inspector and the AP Elements panel.

Modifying AP Element Properties with the Property Inspector

Like every feature in Dreamweaver, AP Elements have properties you can customize using the Property inspector. If you haven't noticed, the AP Elements Property inspector becomes available when you select an AP Element. As you can see in Figure 7.6, the Property inspector outlines properties that uniquely identify the AP Element, set the dimensions of the AP Element, set the stacking order or z-index of the AP Element, and so on. Also notice that moving your cursor just over the AP Element displays properties already set for the AP Element within a yellow ToolTip.
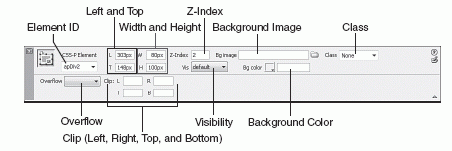
Figure 7.6 The AP Element-based Property inspector outlines numerous customizable properties.

A complete list of customizable properties outlined includes the following:

  • Element ID—Add a value in this text box to uniquely identify the selected AP Element. By default, Dreamweaver adds the value apDiv1, apDiv2, and so on as you add AP Elements to the page. However, the default names mean little to us, so we'll change them. To demonstrate this, select each of the two AP Elements and name them AdaImage and AdaText, respectively. Also note that you can use only standard alphanumeric characters when naming an AP Element. Spaces, hyphens, slashes, and periods are not allowed.
  • L and T—Enter values into these text boxes to set the position of the AP Element from the Left and Top of the browser. The Left and Top values are measured from the top-left point of the AP Element. If you're working with nested AP Elements, the Left and Top values are measured from top and leftmost corner of the parent AP Element.
  • W and H—Enter values into these text boxes to set the width and height of the AP Element. If the content in the AP Element exceeds the width or height of the AP Element, Dreamweaver automatically stretches the AP Element to accommodate the content within it. As you'll see, you can change the Overflow property to set how the browser handles the excess content in the browser.
  • Z-Index—Enter a value into this text box to set the stacking order of the AP Element. The lower the number, the lower the AP Element appears in the stacking order. The higher the number, the higher the AP Element appears in the stacking order. To demonstrate this property, select the AdaImage AP Element and change the Z-Index to 2. Now select the AdaText AP Element and change that Z-Index to 1. Position the AdaImage AP Element over the AdaText AP Element. As you can see from Figure 7.7, the AdaImage AP Element partially hides the AdaText AP Element. You know this is possible because the AdaImage AP Element has a higher Z-Index (2) than the AdaText AP Element (with a Z-Index value of 1).

Figure 7.7 AP Elements with higher Z-Indexes appear above AP Elements with lower Z-Indexes.

  • Vis—Select from the four options in this menu to set the visibility of the AP Element. Options include Default (which is essentially the same as Inherit), Visible (which makes the AP Element visible), Hidden (which hides the AP Element and the content within it), and Inherit (which assumes the visibility property of the parent AP Element when the AP Element is nested). If an AP Element is not nested within another AP Element, the default of Visible kicks in. When an AP Element is hidden, you'll want to use a scripting language such as JavaScript (the Show/Hide AP Element behavior in Dreamweaver's case) to dynamically set the visibility property of the AP Element.
  • Bg image—Use the Browse to Folder icon to find and select an image to use as the AP Element's background. Background images in AP Elements are treated the same as the page and tables, in that images smaller than the size of the AP Element end up tiling. However, you can always use the Repeat property in CSS to set how the background image for an AP Element tiles or repeats.
  • Bg color—Choose a color from this color picker to set the background color of the AP Element. Leave this option blank to make the AP Element transparent.
  • Class—When defining custom class selectors in CSS, pick a class from this menu to change the style of the AP Element according to the properties set out within the class rule.
  • Overflow—Select an option from this menu to set how the browser should treat an AP Element when the content exceeds the width or height of the AP Element. Options include Visible, Hidden, Scroll, and Auto. Choosing Visible forces the browser to stretch the AP Element to accommodate the content in the AP Element. Choosing Hidden forces the browser to automatically crop the excess content when it exceeds the width or height of the AP Element. Choosing Scroll forces the browser to automatically add a scrollbar at the right and bottom of the AP Element. These scrollbars appear even if the content in the AP Element doesn't exceed the width or height of the AP Element. Choosing Auto forces the browser to automatically add a scrollbar at the right of the AP Element only if the content exceeds the height of the AP Element and to add a scrollbar to the bottom of the AP Element only if the content exceeds the width of the AP Element.
  • Clip—Enter values into these text boxes to define the visible area of the AP Element. You can specify values for the Left, Top, Right, and Bottom coordinates to "clip" off content within the AP Element in the same way you'd crop an image in Fireworks or Photoshop.

As you'll see throughout the chapter, an AP Element is nothing more than a <div> or <span> tag complete with a unique ID and a document-wide style rule (by default). Modifying properties in the Property inspector changes the document-wide style rule accordingly. To demonstrate this, switch to Code view. As you can see from Figure 7.8, each AP Element is nothing more than a <div> tag with an ID and a document-wide style rule.

You're probably thinking that document-wide styles aren't the best way of manipulating properties for AP Elements. If that's what you're thinking, you're right! Assuming that you were developing your site entirely in AP Elements, changing all the AP Element's properties in your site would be a nightmare if all the styles were developed within individual pages. A much better alternative is to create an ID within a style sheet that defines AP Element properties globally. When you want to make property adjustments (such as positioning properties), you make them once in the style sheet and instantly those changes are propagated to all of the pages that make use of the style properties. We'll demonstrate this process later in the chapter.
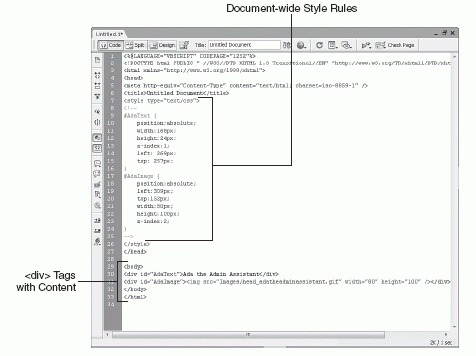
Figure 7.8 AP Elements are nothing more than a or tag complete with a unique ID and an inline style rule.


Printed with permission from Pearson Education from the book Adobe Dreamweaver CS3 Unleashed written by Zak Ruvalcaba.


Digg This Add to del.icio.us


[previous]

URL: