Page Structuring Using Cascading Style Sheets / Page 2
[previous] [next]
Page Structuring Using Cascading Style Sheets: Part 1
Working with AP Elements
Now that you have a formal understanding of the power AP Elements are meant to provide, let's actually insert and work with them in Dreamweaver. In the following sections, you'll learn about the various techniques for inserting AP Elements, modifying AP Element properties through the Property inspector and the AP Elements panel, building a tableless web page using AP Elements and CSS positioning properties, and how to use built-in CSS page layouts.
To begin working with the examples in this chapter, you'll need to download the support files online. As you have done for the rest of the chapters in this book, you can work with the examples in this chapter by downloading the files from https://www.dreamweaverunleashed.com. You'll want to save the files for Chapter 7 in an easy-to-find location. I'll place mine in C:\VectaCorp\Chapter7. Also, don't forget to update your site reference in Dreamweaver to point to the newly created folder.
Inserting an AP Element
You have a couple options for inserting AP Elements into a web page; the method you use depends on your needs and skill set. By far the easiest method for inserting an AP Element is to use the AP Element option in the Insert, Layout Objects submenu. To use this method, follow these steps:
|

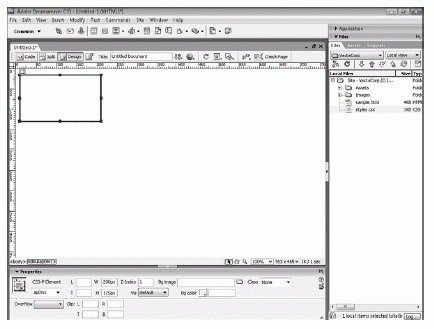
Figure 7.3 A new AP Element is added to the page using the Insert menu.
Initially, you'll notice that the AP Element appears as a box with a border surrounding it. You can easily select the AP Element by rolling your cursor over the border of the AP Element until your cursor turns into the Move icon. Now click to select the AP Element. Notice that the AP Element highlights blue and displays small blue squares, otherwise known as resize handles, at each point and in the middle of each line. Also notice that a handle appears in the top-left corner of the AP Element, also shown in Figure 7.3.
You can use the small resize handles to click, hold, and drag out to resize the AP Element vertically, horizontally, or both. Furthermore, you can use the top-left handle to select and move the AP Element anywhere you want on the page.
Tip: Dreamweaver also allows you to select an AP Element by its border and move it around on the page. If you use this method, make sure that you don't accidentally select a resize handle, or you'll find yourself resizing the AP Element instead of moving it.
Drawing an AP Element
Another simple alternative for adding an AP Element to the page is to use the Draw AP Element method. With this method, you can easily click and draw an AP Element in the page to any dimensions that you want. To use this method, follow these steps:
|
The AP Element is eventually created to look similar to the one created with the first method. The only difference is that by drawing an AP Element, you can set the initial dimensions to anything you want instead of setting them at the default 200 pixels by 115 pixels. We'll use this method, in conjunction with the Grid (explained later in the chapter), to draw AP Elements when we build the tableless version of the Vecta Corp site.
[previous] [next]
URL:


 Find a programming school near you