3D Animation Workshop: Lesson 96: MAX for Character Animation
|
|
Lesson 96 - MAX for Character Animation -Part 3
The skeleton is built to fit inside the model. Here is a front view of the finished skeleton.
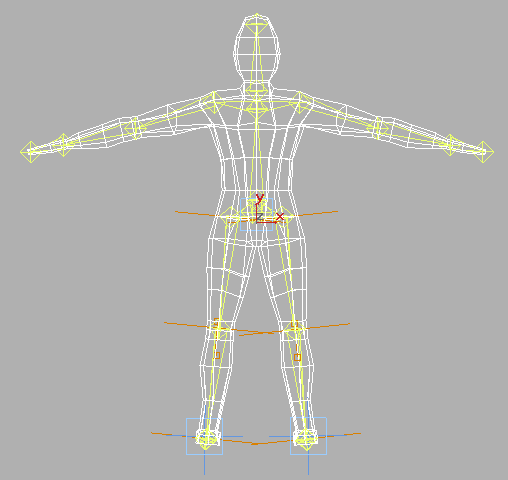
Building any skeleton is no trivial task, and building a viable one in MAX can be especially trying. First, there is a major decision to be made. MAX, like Softimage, allows you to use any kind of object in a skeleton. Thus, one possibility is to build a skeleton out of Box objects. This has significant advantages because the boxes are easily visible and renderable. You can play with and animate the full skeleton with the attached mesh hidden - and then hide the boxes and unhide the mesh to render. There's a lot to be said for this approach, and it's standard practice with many MAX animators.
On the other hand, you can build the skeleton out of Bones, as I did here. Bones are non-rendering objects that are, compared with boxes, hard to see and select. Here's where things get confusing, so take it slow. The main purpose of Bones is to implement inverse kinematics (IK). There are other IK alternatives in MAX, but Bones are the best choice by far. That means that if you want to use boxes in the skeleton, but want to use IK, you have to put Bones inside the boxes. This can get real confusing, especially because the Skin modifier panel will call your boxes "bones." In the end it's workable, because you can hide the Bones inside the boxes, but it's a hurdle for the newcomer. The following image shows this kind of setup for the lower body.
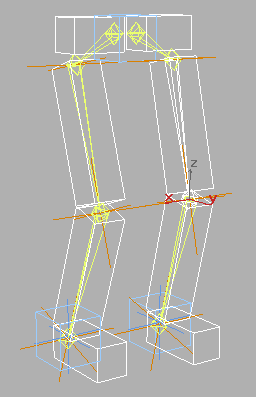
This image is worth some serious attention because it makes something very clear about MAX's (yellow) Bones. They are not bones at all, but rather joints  the points where bones meet or where bone chains terminate. This can make things rather confusing. For example, in the image, a Bone is selected that appears to represent the left thigh. But this is really only the knee joint, and rotating it actually rotates the next box in the chain  the left calf. By contrast, the boxes will deform the character mesh, and thus the box containing the highlighted segment could really be treated as the thigh. Thus, where this "Bones and Boxes" setup is used, the Bones can be treated as joints (like knee and ankle), and the boxes treated as what most of us would call "bones." (Are you confused enough yet?)
If we use only Bones (without boxes), as I did, you are therefore faced with the issue of not only using the bones for rotation (IK or otherwise), but also of using them as the units to which to bind the vertices on the mesh using the Skin modifier. Thus, unlike the Boxes example, we need a Bone in the foot to control the foot vertices, even though the Bone is rotated by the "ankle" Bone before it in the chain. And we are faced with naming problems. Should a Bone be named "knee" because it represents that joint, or should it be named "thigh" because the thigh vertices are attached to it? This is an important issue because character animation can get impossibly confusing if the elements of the skeleton are not well named.
We'll pick up from here next time.
| To Return to Parts 1 and 2, Use Arrow Buttons |
|
Created: July 3, 2000
Revised: July 3, 2000
URL: https://webreference.com/3d/lesson96/3.html
 Find a programming school near you