3D Animation Workshop: Lesson 96: Max for Character Animation
|
|
Lesson 96 - Max for Character Animation - Part 2
Another issue with MAX has been character modeling. MAX's organic modeling toolset was weak and difficult to use by comparison with just about any competitor. But the R3 revision improved things in this area as well. Smoothed polygonal modeling (subdivision surfaces) became significantly more workable with improvements to the MeshSmooth modifier. And advancements in the area of Bezier Patch modeling were MAX's special contribution to organic work.
These developments in MAX's character toolset are impressive, but that doesn't mean that everything is hunky-dory. As is typically of MAX generally, most problems are not with the absence of tools, but rather with the unreliability or clumsiness of the tools that exist. To take the most obvious example, anyone who has ever used inverse kinematics in the competing packages will find MAX's IK frustrating and quirky. It just doesn't behave reliably, or requires special knowledge or experience to use.
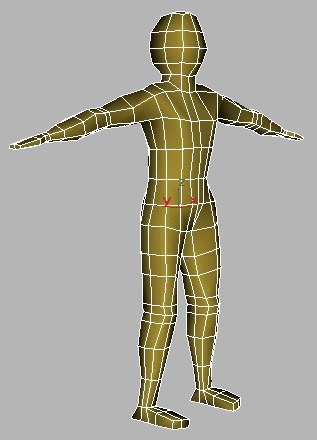
Let's start our critical examination by boning the following mesh.

This mesh is composed of 432 quads (864 triangles). It's therefore lightweight enough for realtime use or can be used as a cage for a subdivision surface using MeshSmooth. In any case, I designed it to be very generic, with just enough vertices for meaningful deformation control. I don't want to get off the subject, but this mesh was created using a new technique I discovered in which an EditablePatch model is used effectively as a polygonal mesh. This solves a host of problems that arise when trying to work with quadrangles in an EditableMesh, and is really a sort of breakthrough as far as I'm concerned. I'll get to the topic in a future lesson.
This view of model makes it look a bit distorted, but I chose it because you can see that the knees are slightly bent and that the two legs are rotated outward slightly from each other. The arms are extended, but below shoulder height. It's usually best to pose the arms like this, or even a bit lower, so that they can be deformed down to the character's sides without excessive stress.
| To Continue to Part 3, or Return to Part 1, Use Arrow Buttons |
|
Created: July 3, 2000
Revised: July 3, 2000
URL: https://webreference.com/3d/lesson96/2.html


 Find a programming school near you