3D Animation Workshop: Lesson 86: Cult3D Automates Interactivity
|
|
Lesson 86 - Cult3D Automates Interactivity - Part 3
Cult3D Designer runs only on Microsoft Windows. Moreover, at the present time it can only get its scene contents from 3D Studio MAX, through an exporter plug-in. I suppose that, if you had to pick a single 3D package, MAX would be the most viable platform, but this is one of the reasons that I support the idea of using VRML files (exportable from all major packages) as the basis of Web 3D.
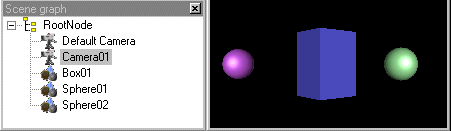
A converted MAX scene file, once loaded into Cult3D Designer, appears in a viewing window with an accompanying Scene Graph, showing the hierarchical relationship of all of the objects in the scene. In the following image, we see a simple scene from the Cult3D tutorials, consisting of three objects.
The nerve center of Cult3D Designer is the Event Map panel. In this window, icons are connected up to create interactivity and animation in a simple, but powerful way. For example, in the following Event Map, I first dragged the Box object in from the Scene Graph. Then I dragged in the Event icon, representing a left mouse click. Finally, I dragged in an icon representing a Translation action and placed it in the middle. I connected these three icons up by dragging them on top of each other, generating the lines shown in yellow when the Event icon is selected.

Readers with a VRML background will recognize fundamental concepts at work. An event message is generated by the mouse click, which triggers an animation interpolator (in this case, a translation interpolator). The translation interpolator sends its constantly changing values to the Box, causing that object to move across the screen. In precise VRML terms, this is the same as routing from a Touch Sensor to a Time Sensor to a Position Interpolator to the Transform of the Box object. But Cult3D Designer makes the process feel simple and nonthreatening.
The translation is set using a dialog box, seen below. Note how you can set the distance in any direction, and the time over which the translation will take place. In this case, the Box will move 50 units in the x direction over 1000 milliseconds (1 second). You can also create sequences composed of multiple units of animation, by dragging the translation icon onto a sequence icon in the Event Map.

After performing these simple steps, I could start the animation by left-clicking on the Box in the viewing window.
Cult3D's graphical approach to interactivity is very intelligent and easy to learn, and it can be used to build surprisingly complex interactions. We'll take a further look next time.
| To Return to Parts 1 and 2, Use Arrow Buttons |
|
Created: Feb. 14, 2000
Revised: Feb. 14, 2000
URL: https://webreference.com/3d/lesson86/part3.html
 Find a programming school near you