3D Animation Workshop: Lesson 71: 3D Studio MAX 3 Reviewed
|
|
Lesson 71 - 3D Studio MAX 3 Reviewed - Part 2
I'm ready to bet some serious money that MAX 3 will obliterate the current distinction between the upper and lower tiers in professional-level 3D, and that it will force its higher-end competitors to rethink their price points. I'm also ready to say (and I never thought I would say it), that MAX 3 is probably the safest bet for someone looking to enter 3D and learn their first professional-level package. Let me share my thinking with you.
Polygonal modeling has always been a struggle in MAX. At the low-poly end, the mesh editing toolset is overly complex, and even the basic tasks of vertex and polygon selection are much harder than in any other program. MAX 3 has made a couple of improvements that make a drastic difference. Selected polygons can now be highlighted in shaded mode (as in Softimage and Nendo), making it easy to see what you've got. And, more importantly, MAX 3 has introduced a Transform Gizmo in the style of the similar tool in Maya. Selected objects and subobjects can be transformed (moved, rotated or scaled) by pulling directly on the coordinate axes of this tool. These two improvements make mesh editing immeasurably easier, especially when working in a perspective view. The following image shows the Transform Gizmo being used to move a selected vertex.
As for organic polygonal modeling, MAX has been hopelessly behind Lightwave. Lightwave's MetaNURBS feature standardized the modeling technique that permits you to work on a cage version of a polygonal model, while seeing the subdivided ("smoothed") version of the same time. This allows the modeler to treat the vertices of the cage as though they were the control vertices of a NURBS model. But the price of success is imitation, and MAX 3 has adopted this approach in the new version of the MeshSmooth modifier, illustrated in the following image. As good as it is, the absence of an interactive Knife tool for cutting up the cage remains a serious disadvantage compared to Lightwave. But it's no longer possible to say organic polygonal character modeling is "impossible" in MAX.
Perhaps even more important for the future of organic character modeling in MAX are the extraordinary improvements in the Patch (Bezier patch) modeling tools. At one point, the MAX people seemed to have adopted the view that NURBS would be the organic character modeling toolset of choice. But NURBS modeling is not only unbelievably difficult to learnÂit is also less than ideal for much character work because its difficult to produce smooth, branching architecture out of multiple connected surfaces. The Bezier patch modeling tools will open your eyes because you can build branches (like arms and fingers) by simple extrusion, yet edit the surfaces directly with splines. The following image shows a small surface of Bezier patches, with the central patch shaped into a circle. The circular patch is then extruded, just like a polygon, and the underlying mesh is revealed. This is quite amazing and, unlike the other features I've discussed, is MAX's own creation.
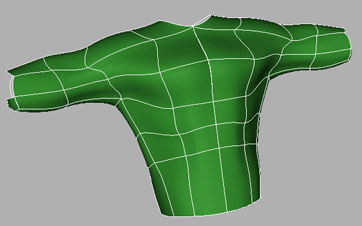
Character modeling with this toolset is a pleasure and the results are extremely effective. Note how much detail is possible with so few defining curves.
| To Continue to Part 3, or Return to Part 1, Use Arrow Buttons |
|
Created: July 19, 1999
Revised: July 19, 1999
URL: https://webreference.com/3d/lesson71/part2.html
 Find a programming school near you