3D Animation Workshop: Lesson 68: Trimming MAX NURBS
|
|
Lesson 68 - Trimming MAX NURBS - Part 1
Let's push into new ground in this series of lessons on MAX NURBS. Today's subject is trimming NURBS surfaces.
No single area of NURBS modeling is as unique as surface trimming. One way or the other, most other aspects of NURBS modeling bear some resemblance to straight polygonal modeling or spline-based polygonal model. Control vertices on NURBS curves or surfaces are not all that different than the vertices of a polygon mesh. Lathing and lofting are already familiar polygonal modeling tools, although they utilize Bezier or Cardinal splines rather than NURBS curves. Thus when you first approach NURBS modeling, you generally have some of basic concepts at hand.
But trimming introduces an entirely new way of thinking.
Trimming a surface involves two logical steps. First, you have to create a NURBS curve that is made to lie directly on a NURBS surface. Second, you trim the surface using the curve by effectively hiding all of the surface on one side of the curve.
Let's start by getting a curve on the surface. A surface curve is rather different from a regular NURBS curve. The surface curve is constrained to the surface and follows its contours. But it is not part of the surface itself. It is not an isoparametric curve. It can be drawn in any shape as long as it stays on the surface. Think of it like a curve drawn with a pen on the surface of a ball, or even on a flat sheet of paper. The surface curve does not need to be used for trimming the surface, but it generally will be.
MAX has a number of ways of getting a curve on a surface. You can draw a curve directly on the surface, but this method is not very reliable. The most important method is by projecting a regular NURBS curve onto a surface. We'll start with a closed curve that will fit entirely within a flat surface. The following image shows the setup. A flat NURBS surface stands behind, and a slightly elongated, roughly circular, closed NURBS curve is positioned in front.
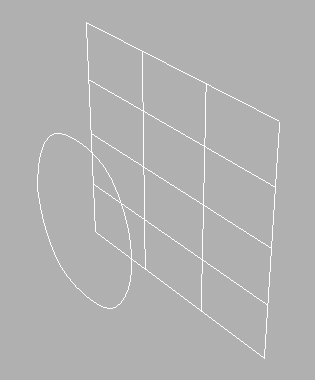
To project the curve onto the surface in MAX requires the creation of a Vector Projected Curve. The direction of the projection is the direction that you are looking at through a given viewport. Thus, to make this setup work, we need to project the curve from a front viewport, like so.
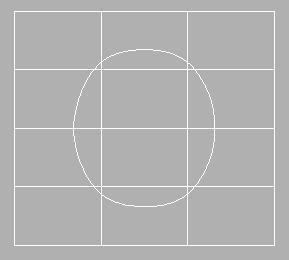
After projection, there is now a green Vector Projected Curve on the surface.

| To Continue to Parts 2 and 3, Use Arrow Buttons |
|
Created: June 8, 1999
Revised: June 8, 1999
URL: https://webreference.com/3d/lesson68/
 Find a programming school near you