3D Animation Workshop: Lesson 66: From MAX NURBS to Polygons
|
|
Lesson 66 - From MAX NURBS to Polygons - Part 2
If we extrude this curve into a NURBS surface, and look at the tessellation in wireframe, we can see that the approximation method used for the surface has no necessary relationship to the method used to approximate the curve. The ideal curve, and not its approximation, is used to extrude the surface. The surface is approximated adaptively even though the curve was approximated in using 3 steps between knots.

In fact, the curve approximation tools and the surface approximation tools are in completely separate rollouts in the NURBS Surface object panel. We can ignore curve approximation from here on, and focus on the much more important issue of approximating surfaces. Here is the Surface Approximation rollout in MAX 2.5.
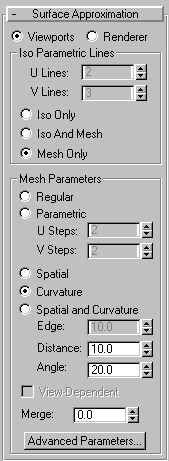
Note first how, at the top, you must choose between Viewport and Renderer. The settings you enter in this panel apply only for viewport purposes or for output rendering purposes, depending on which radio button is selected. It makes very good sense to permit different settings for these two purposes. Your viewport approximation can be much coarser than your render to maximize interactive speeds. NURBS can be very slow to work with in MAX, so keep your viewport approximations crude and fast. Save the fine tessellation for your renders.
The top section of the rollout, titled Iso Parametric lines has nothing to do with tessellation, but has a great deal to do with how MAX displays NURBS surfaces. The choice is always between a wireframe view using isoparametric curves and a tessellated mesh that is viewable either in wireframe or shaded preview. As this section is only for display purposes, it is disabled when you are setting values for the renderer.
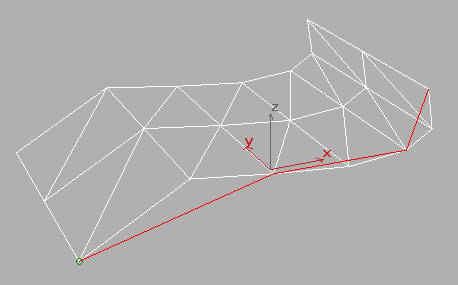
The Mesh Parameters Section is where all the meat is. The only way to understand these critical choices is to make visual comparisons. Here is the Regular option set to 6 steps in the U direction and 2 steps in V. The generator curve is highlighted in red to see the knots and curve segments. As there are 3 segments in the U direction, the setting of 6 steps creates two steps on the surface between knots. Note the difference between this and the curve example in Part 1 of this lesson. With curve approximation, the steps value determines the number of linear steps per segment (i.e., between knots). With the Regular surface approximation option for surface, the steps value is the number of steps across the entire surface.
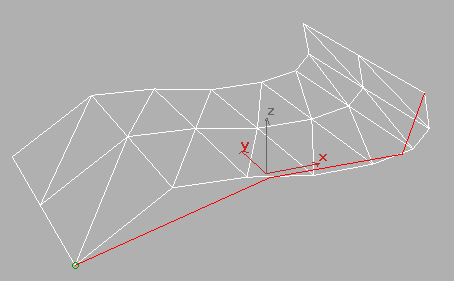
This peculiarity becomes more evident if we use a step value that doesn't divide into the number of segments. If the steps value in U is changed to 7, the surface subdivison no longer jibes with the knots. Yet the distribution is still based on the length of the segments because the subdivision is tighter in the shorter segments. This is definitely confusing, but the practical result is useful and flexible. It's easy to fit precisely within maximum face counts because you increase the tessellation incrementally, and not as straight multiples of the number of curve segments. For example, this version with 7 steps has exactly 4 more triangles than the previous version using 6 steps.
By contrast, the parametric tessellation method respects the knots and segments, but the values are confusing. Here is the same surface with Parametric tessellation, using 1 steps in U and 2 in V.
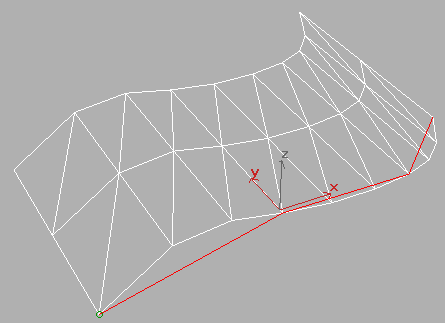
This is very strange because it created 3 steps for each segment in the U direction, even though we set the value to 1. Meanwhile, it created the correct 2 steps in the V direction. I haven't figured the logic of this out yet (if there is any), but at least we're working in multiples of the number of segments. Increasing the U steps to 2 doubles the amount of faces because there are now 6 steps per segment rather than 3. Like so.

| To Continue to Part 3, or Return to Part 1, Use Arrow Buttons |
|
Created: May 12, 1999
Revised: May 12, 1999
URL: https://webreference.com/3d/lesson66/part2.html
 Find a programming school near you