3D Animation Workshop: Lesson 66: From MAX NURBS to Polygons
|
|
Lesson 66 - From MAX NURBS to Polygons - Part 1
I hope you're ready to dive deep into NURBS, because this time we're going to be covering some very important material. I wish someone had explained this stuff to me when I started with NURBS modeling. These are concepts that are essential to professional NURBS modeling and animation. So take a deep breath.
In the previous lesson, we touched upon the role that the renderer plays in creating the renderable geometry when NURBS surfaces are used. This is one of the most important things to understand about NURBS and how to model with them. Ultimately, a rendering engine must be fed polygons. NURBS surfaces are ideal curvature, and therefore must be tessellated into a mesh of triangles in order to be rendered. This process is called "surface approximation," and the terminology is revealing. A smoothly curving surface cannot be precisely represented by polygons. Rather the tessellation can only approximate the surface. The denser the mesh, the better the approximation. But a very dense mesh sucks up render time. The best approximation methods are those that create a finer mesh in areas of greater curvature and a coarser mesh in the flatter areas. This kind of intelligent surface approximation is called "adaptive" approximation, and it's essential for the efficient rendering of NURBS surfaces.
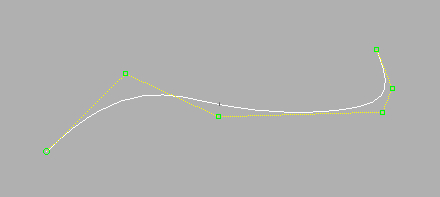
Let's examine the idea with NURBS curves before turning to NURBS surfaces. Here is a NURBS curve with varying degrees of curvature. It starts out softly curving on the left, straightens out for a while, and then finishes at right with a tight bend.
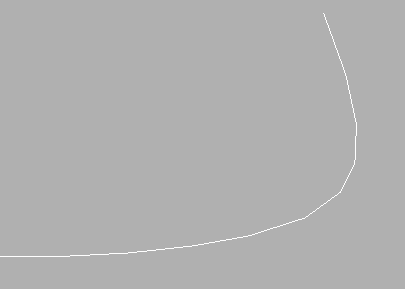
This looks pretty smooth at this size, but if we zoom in, we see that it's actually composed of linear pieces. The NURBS curve is, as we already noted, an ideal. To display it in the viewport or to render it to a bitmap, it must be divided into linear units. (Remember that the display in the viewport is a rendering, although of much lower quality than a true output render.) The endpoints of each linear unit are precisely on the curve, but the unit themselves will obviously differ from the curves if the curve it not itself linear at that unit.
The following close-up of the previous image shows the adaptive subdivision that is the default in MAX. Note how there are more, and therefore shorter, segments through the bend in the curve. The segmentation can be difficult to see because of the low resolution of a video monitor, but you should get the idea.
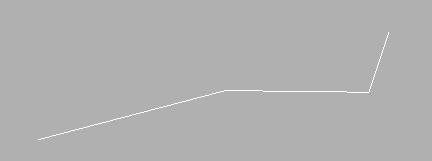
The other way to divide a NURBS curve into the necessary linear segments is using equal linear steps between knots. A NURBS curve is actually composed of one or more curve segments that meet at points called knots. You can't see the knots directly. They are created and controlled by the CV's. If, instead of using an adaptive method of subdivision, we create only single linear steps between the knots, we can see the location of the knots clearly. Each linear step corresponds to a NURBS curve segment.
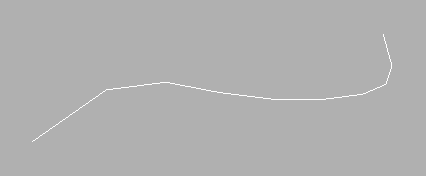
If the step value is increased to 3, the curve is subdivided into 3 linear steps between the knots. This produces more endpoints directly on the curve, and therefore a much closer approximation for the curve (although it's still very rough.) There is a kind of "adaptive" result even using the steps method because the knots are closer together in the tighter area of the curve.
Let's move these ideas from curves to surfaces.
| To Continue to Parts 2 and 3, Use Arrow Buttons |
|
Created: May 12, 1999
Revised: May 12, 1999
URL: https://webreference.com/3d/lesson66/
 Find a programming school near you